 Menu
Menu
Microsoft Dynamics 365 / Power Platform - page 4
Nov 12, 2014 - AX2012 Extension Framework
Filed under: #daxmusings #bizappsIn a lot of ways, us X++ developers have gotten lazy over the years. If you take a step back, there are a lot of things we do today that you probably would never do in any other programming environment. Some of it is because it’s just quick and easy, regardless of the less quick option being more robust or cleaner. In other cases, it’s just because “that’s how it’s done” (tm) in the standard Microsoft Dynamics AX code. Every now and then some new feature in the language or frameworks will come along, and it’s either not documented or nobody really knows much about it. And in most cases it’s barely used in standard code. Even things that everyone knows about, like events, are totally underused in the standard code base. To cut Microsoft some slack, they obviously have millions of lines of code that would have to be changed to adopt all these new features. And that obviously won’t happen overnight. Anyway, I wanted to point out this under-documented framework called the Extension Framework. I’ve only seen some minor blog posts about it, but I couldn’t find it on MSDN or Technet anywhere. Regardless, I think this has great potential - especially for ISVs or Partner solutions that need to become more plug & play.
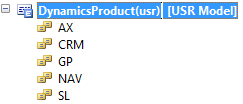
So, in this blog post we will create a totally unexciting set of classes. You’ll recognize the standard AX pattern immediately. First, I have a base enum defining the different Dynamics products:
Next, I have a base class named Dynamics.
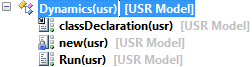
It has a new method that’s made private (forcing people to use the static constructor) and a run method that has an exciting infolog message.
private void new()
{
}

public void Run()
{
    info("base class");
}
Next, we’ll make a derived class for each of the Dynamics products:
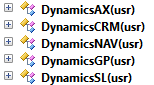
Each one will extend the base class and override the Run method to show a different infolog. Below is the code for the DynamicsAX and DynamicsCRM class, you get the idea for the other classes…
public class DynamicsAX extends Dynamics
{
}

public void Run()
{
    super();

    info("Dynamics AX");
}
public class DynamicsCRM extends Dynamics
{
}

public void Run()
{
    super();

    info("Dynamics CRM");
}
Great. So now that we have our sub types, we can create the “classic” construct method on our base class. On the base class “Dynamics”, create a new static construct method, which takes our base enum as a parameter, and returns the correct sub type for it.
public static Dynamics construct(DynamicsProduct _product)
{
    Dynamics dynamics = null;

    switch (_product)
    {
        case DynamicsProduct::AX:
            dynamics = new DynamicsAX();
            break;
        case DynamicsProduct::CRM:
            dynamics = new DynamicsCRM();
            break;
        case DynamicsProduct::GP:
            dynamics = new DynamicsGP();
            break;
        case DynamicsProduct::NAV:
            dynamics = new DynamicsNAV();
            break;
        case DynamicsProduct::SL:
            dynamics = new DynamicsSL();
            break;
        default:
            throw error("Unsupported product");
    }

    return dynamics;
}
Nothing too crazy here, a very traditional pattern you see a lot in Dynamics AX. Finally, we can create a static main method on the base class to run it. For the sake of this article, we’ll just hard code the product to be AX (because that’s what we’re really here for, isn’t?). Feel free to create menu items with parmenum or something, but to keep it short and to the point, hard coding will do. So again, on base class “Dynamics”, add the main method:
public static void main(Args _args)
{
    Dynamics dynamics = Dynamics::construct(DynamicsProduct::AX);

    dynamics.Run();
}
And of course, when we run this, we’ll see the infologs showing. The base class declaring it’s the base, and the sub type declaring it’s Dynamics AX. Perfect!
At this point, let’s take a break and step back. What’s wrong with this pattern? First of all, there is no way to extend this code base without either changing the code or overlayering (the construct method). Secondly, from a more design approach, it seems bad that the base class has to have explicit knowledge of all the sub classes. Put together, this is not very extension-friendly. If we would have two ISV products that both extend this, someone will have to merge the code. And nobody likes merging code.
So, extension framework! The idea is to use the new attributes feature in the X++ language to decorate the classes, and make a constructor that can dynamically find the right sub class, assuming there is one. So first, we need to create a new attribute. An attribute is basically a class that extends the base SysAttribute class. An attribute can have different properties, some mandatory, some optional. In this case, we want to use the attribute on a class to tie it back to one of the enum values. So, our attribute should have a property to hold that enum value. The base enum was called “DynamicsProduct” so we’ll declare a member variable to hold that. We’ll call our attribute class “DynamicsProductAttribute”.
class DynamicsProductAttribute extends SysAttribute
{
    DynamicsProduct product;
}
Since we don’t really have class properties in X++, we need to create a set/get method, or as X++ likes to call it, a PARM method. Basically, a way to access the member variable to read or update it.
public DynamicsProduct parmDynamicsProduct(DynamicsProduct _product = product)
{
    product = _product;

    return product;
}
Now, to make this a mandatory property on the attribute we can add it as a method parameter on the new method. So, override the new method on the “DynamicsProductAttribute” class.
public void new(DynamicsProduct _dynamicsProduct)
{
    super();

    this.parmDynamicsProduct(_dynamicsProduct);
}
So, that’s really it for the attribute class. Now we can actually start using it to decorate our sub classes. No need to touch the base class, but on all the sub classes, we want to add the attribute in the classdeclaration. Again, I’ll just show the example for the DynamicsAX and Dynamics CRM classes:
[DynamicsProductAttribute(DynamicsProduct::AX)]
public class DynamicsAX extends Dynamics
{
}
[DynamicsProductAttribute(DynamicsProduct::CRM)]
public class DynamicsCRM extends Dynamics
{
}
Decorate each sub-class with the attribute and the correct enum value. This approach makes a whole lot more sense. Now each sub-class is declaratively tying back to a specific enum value. So finally, we of course need to change the constructor on the base class to make use of this at run time. This is really the only part where there’s a “framework” really in place. On the base class “Dynamics”, we’re going to change the static construct method. Now, we can ask the extension framework to grab us the class with a specific attribute. Of course we’re interested in the DynamicsProductAttribute, but more importantly we’re interested in the class that has that attribute but also has a specific value for its property (in our case, the enum DynamicsProduct). The extension framework just asks us what base class we want to grab sub classes for, as well as an INSTANCE of the attribute it should have. The reason we need an instance is because it needs all the properties (in our case we only have 1, but you could have several properties). To get all this done, we can call the static “getClassFromSysAttribute” method on the “SysExtensionAppClassFactory” class. We give it the base class name (“Dynamics”) and the attribute we want, which has to be an instance, so create an instance and set the correct property value. Your new and improved (and shortened) construct method should look like this now:
public static Dynamics construct(DynamicsProduct _product)
{
    Dynamics dynamics = SysExtensionAppClassFactory::getClassFromSysAttribute(classStr(Dynamics), new DynamicsProductAttribute(_product));

    return dynamics;
}
Since our static main was already using construct, you can just re-run the main and everything should work. Note that this class factory business caches EVERYTHING. If you’ve run it once, and then re-run after making changes, it may not pick up new classes or changed attributes. From the Tools menu, you can run Tools / Caches / Refresh Elements to flush the cache so it will pick up your changes.
Let’s review what we can do now.
- To extend this solution, we can add a new enum value. Create a new class, use the product attribute and tie it to the new enum value, and everything will work. No need to change any code, only adding code and decorating it!
- Of course, we use an enum here which isn’t necessarily extension friendly, but there’s nothing stopping you from using other data types, multiple properties, etc.
- The “choice” of which base class to use could be from a parameter per company, or based on a value in a record, whatever. The possibilities are bigger than you might think. Of course the traditional construct has this as well, but the ease of extending and swapping things out without having to mess with the code are pretty great.
Oct 8, 2014 - AXUG Summit in St. Louis
Filed under: #daxmusings #bizappsNext week (October 15-17) is the AXUG Summit in St. Louis. I will be presenting in various sessions and also participating in two MVP Panel sessions (“Ask the Experts”) - which for some reason aren’t showing up under my name on the site, but trust me I’ll be there :-)
And if you are an active AXUG participant you may have noticed I’m presenting a full day hands-on implementation of TFS in the pre-conference training on Tuesday the 14th. I’m excited about this day. I’ve been talking and writing a lot about TFS, showing examples and doing sessions for AXUG - but this is the first time I’m doing a public workshop and helping people to get it up and running. I’ll be sure to report back how it went, and I’m reviewing releasing some or all of the material I’ve created some time in the future.
If you’re attending the AXUG Summit come say hi. I can be found running around sporting my usual fedora hat.

Aug 12, 2014 - TFS Build Library "Hotfix" Update - Beta of AX2009 TFS Library
Filed under: #daxmusings #bizappsYesterday I made an “emergency” update to the TFS build library on DynamicsAX Admin on CodePlex. A while ago we implemented ASYNC activities as well as support for the AXBUILD process at about the same time. Some copy/paste errors resulted in the regular compile (non-axbuild) to no longer read the compiler log - so no errors or warnings were being shown. We hadn’t actually ran into this ourselves, since we’re most occupied on R2 and we always use the latest kernel for builds, so we were able to use AXBUILD for all R2 clients. And, admittedly, our old clients were still running on older versions of the build libraries - so we didn’t see the error until now.
With that being said, I strongly encourage you to get the new library, since you won’t actually see any compiler output probably unless you’re using AXBUILD.
And while we’re at it, I felt it good enough to release a beta version of the AX2009 port of the library as well. There were tons of fixes over the past week, in case anyone used the source code to build their own. There are a few caveats. We ran into issues with the DB restore activity on SQL 2008 R2, since one feature we were using in the SQL scripts wouldn’t work. As a result we changed to using the SMO libraries (SQL Management Objects). Right now we’re making the assumption that 1) the SMO libraries are installed and 2) that they are for SQL 2008 R2. Unfortunately I haven’t had time to make any sort of documentation and there are several new activities, mostly around the Application Files (in lieue of model store activities). Feel free to contact me with questions. Currently I have only built the libraries against TFS 2013 assemblies, please drop me a line or leave a comment if you have a need for a TFS 2012 version.
Since 2009 layers don’t have version number, we include an option in our CombineXPOs step that creates a Macro with a name of your choosing and contents of your choosing. You can set the build number as the contents of the macro, and perhaps include a mod to your about screen to show whatever is in the macro (which will be created on the fly).
Aug 7, 2014 - Admin and TFS utilities for AX 2009
Filed under: #daxmusings #bizappsFor those of you reading this blog, you’re probably aware by now how heavily me and my team use TFS with AX 2012. However, we’ve been building this knowledge since AX2009 and we’ve done automated builds even with AX 2009 all the way back to 2010. First we had VB Scripts, then we changed to PowerShell, and finally the custom activities, which saw a full rewrite last year ( http://dynamicsaxadmin.codeplex.com/releases ). Let’s call the latest released activities GEN4 of our build scripts :-) Unfortunately our builds for AX 2009 haven’t kept pace. Mostly since they were “good enough” and of course our focus is mostly in AX 2012. But we are still supporting quite a few AX 2009 clients. A recent push to re-organize some of our TFS infrastructure has also pushed me to re-evaluate improving our builds for AX 2009.
So, for starters I reviewed whether the current libraries from CodeCrib.AX.TFS and dependencies would take a lot of work to make them compatible with AX 2009. In reality, there is not a ton of work to be done, but realistically there’s only so much investment I wish to make for an older product. I realized that with some refactoring, it would be possible to have the existing libraries support both AX 2009 and AX 2012, but again I just don’t have the time or inclination to do much of that for a handful of builds I need to do.
Against my better judgement I decided to go the quick and cheap route, and basically branch off the existing code, rename the namespace (to avoid DLL issues when both are loaded in TFS build controllers) and fix/change what needed to be changed to support AX 2009. For those of you wanting to try this out, the code is not released yet but you can surely grab a copy in the source tree on CodePlex on http://dynamicsaxadmin.codeplex.com/SourceControl/latest#Main-AX2009/. I’ll be testing this for the next several days with our existing codebases so there may be patches coming up. However, I wanted to throw this out there, also because this has the admin utilities (including PowerShell) similar to what the AX2012 version supports, so it’s not just TFS. Note that I did not port the Setup library yet. I’m guessing that the 2012 library will basically just work with AX2009 as-is, but I could be wrong there. I’ve had no need for that but if anyone is interested I can definitely review it and branch it as well.
So, you’ll probably see another announcement in a few weeks or so when I feel comfortable the code is working correctly. Until then, feel free to play with the activities and let me know what you find!
Apr 10, 2014 - Easy Automated Builds - Part 3
Filed under: #daxmusings #bizappsIn Part 1, we discussed installing the custom activity DLLs into TFS so the build controller and agents can use them. In Part 2, we reviewed where the default build workflows reside in TFS and where we want to inject or Dynamics AX specific activities. So now, we’re ready to actually build a workflow.
Before we begin, there are a few concepts that need explaining. When setting up a workflow, you can specify parameters to make it more generic. This will allow you to share the workflow across multiple build definitions, but run it with slightly different options. These are called “Arguments”. Inside the workflow, you may need to store data in variables to pass from one activity to another in the workflow. For this purpose there are also “Variables”.
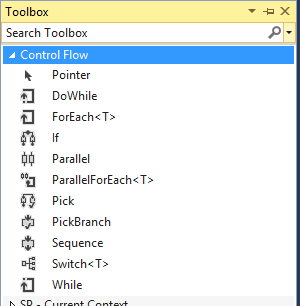
In Part 2 we discussed the location to put the activities in. If you deleted the existing items as shown, you’ll need to add a new “Sequence” activity. There are some basic “control flow” activities available in the TFS workflow: Sequence (a list of sequential steps), Parallel (a list of parallel tasks) and some others like foreach loops etc. These are listed in the Toolbox under “Control Flow”. Open the ToolBox from View > Toolbox.
One of the differences again between TFS 2012 and TFS 2013 is that the build in TFS 2012 stores all the build information (build number, source directory, binary output directory, etc.) in variables in the workflow. In TFS 2013 everything gets stored in environment variables. The main idea with TFS 2013 is to be able to attach a PowerShell script pre- and post build (these are arguments to the workflow) so that you can do things without having to modify the workflow. So storing all the information in environment variables solves the issue of having to pass all that info to the PowerShell script. What this means is that we need to add a few extra activities in TFS 2013 (skip this step in TFS 2012) to get some important information. The main things we want to get are the sources directory, the binaries directory, and the build number.
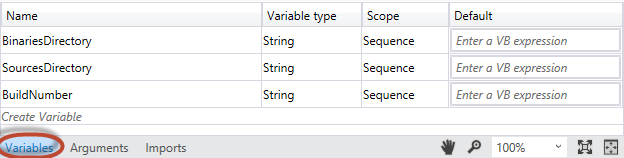
So for a TFS 2013 flow we need to add three new variables. You’ll find the Variables list by click on the “Variables” tab at the bottom of your workflow screen. We will add three Strings and you can leave the scope to “Sequence” which should show up as your default.
Next, find “Team Foundation Build Activities” in the Toolbox, and drag & drop the GetEnvironmentVariable
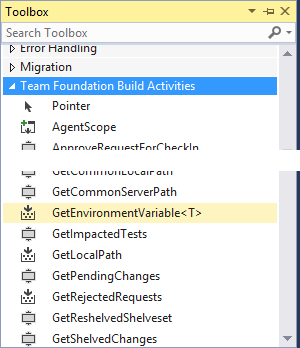
For the purpose of this workflow, we want three of those, so drag three GetEnvironmentVariable
Microsoft.TeamFoundation.Build.Activities.Extensions.WellKnownEnvironmentVariables.BinariesDirectory Microsoft.TeamFoundation.Build.Activities.Extensions.WellKnownEnvironmentVariables.SourcesDirectory Microsoft.TeamFoundation.Build.Activities.Extensions.WellKnownEnvironmentVariables.BuildNumber
You can give it a nice name for a DisplayName, something like “Get Binaries Directory”. In the “Result” property, we give it the name of the variable we created, to store the string in. If you follow my screenshot, you’ll have a BinariesDirectory, a SourcesDirectory and BuildNumber variable to assign to.
So with that done, we’re back onto our actual work, including TFS 2012 and TFS 2013. Of course there are different ways to conduct the build, and I’ve outlined what we are using in this post but let’s start with something simple here. First, I’m a big fan of “cleaning” an environment. Similar to a build from Visual Studio, you want to remove any artifacts from the last build, especially if you are using one AOS to do multiple builds for multiple code bases. But that brings up a point. You have to evaluate what it is you are trying to do exactly. For this example build I’d like to go “traditional” and assume that we are putting code in, and getting a binary (=ax model) out. So, no need to keep IDs or anything of the sort, we can just blow away all the code, and import all the code anew. To achieve this, you could just uninstall models from all the custom layers. That’s what we initially did but for efficiency we changed to just restoring a base database and modelstore db. This has the advantage that you won’t run into synchronization issues because you uninstalled models. It’s also a bit more predictable in general, and a db restore doesn’t take long at all (of course, or data-database can be empty - we don’t care about data in this environment).
Before we get started, we need to get our custom build activities in the Toolbox. Open the toolbox and right-click somewhere on the window, and select “Choose Items”.
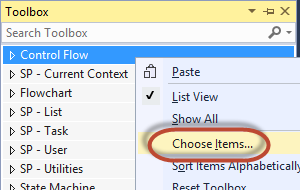
On the “Choose Toolbox Items” dialog, open the “System.Activities Components” tab and click the “Browse” button.

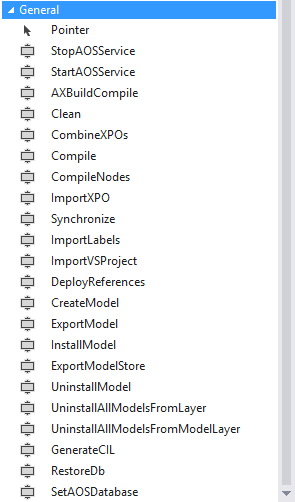
Browse to the location where you saved the DLLs for Visual Studio’s use, as discussed in Part 1. By default, this would be in C:\Program Files (x86)\Microsoft Visual Studio 12.0\Common7\IDE\PublicAssemblies (or 11.0 for VS 2012 and 10.0 for VS 2010). Once opened, you’ll notice the CodeCrib.AX.TFS namespace activities showing up, and they should be checked by default. Click OK to confirm. Now you should see the activities show up under the “General” section.
So, for our workflow we first need to make sure the AOS is stopped. The “StopAOSServer” activity will either stop the AOS if it’s running, or just not do anything if it’s already stopped. Drag & drop the StopAOSServer activity into your workflow. Right-click it and select “Properties”.
Brief intermission. All of the activities in the TFS library are meant for ease of use. That means they contain as many defaults as possible, but as many options as possibly needed in case you want to do advanced things. There are a few key things to understand:
- Anything in these activities will be executed as the build agent user. So, the build agent user needs to be an administrator on the box to have access to start/stop services, it needs access to AX (as a user) for importing XPOs etc, and it needs direct SQL permissions to be able to modify the model store. If you do any sort of file system work like copying files, creating folders, etc - make sure the build agent will understand the paths and have access to them.
- None of the activities REQUIRE any settings to say which AOS or which client configuration to use. By default, it will look for the current user (ie the build agent user) and that user’s default configuration. From that configuration it will also find which AOS we’re working with. However, all activities accept an optional “ConfigurationFile” property, where you can specify a config file. Same thing, it will read the config file to figure out which AOS account it needs to manipulate. If you want the fine details on all the activities’ properties, check the reference page.
So, what I would urge you to do is to create an “Argument” where you can optionally specify a configuration file. Then, make sure all activities point to that argument and your workflow will be most flexible. So for this AOS STOP activity, I created a string argument “DynamicsAXConfigFile”, and then here’s what I have in the AOS properties:
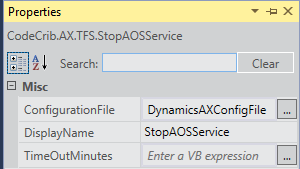
You can optionally specify a time-out on stopping the AOS. Note that that time out is specified in minutes.
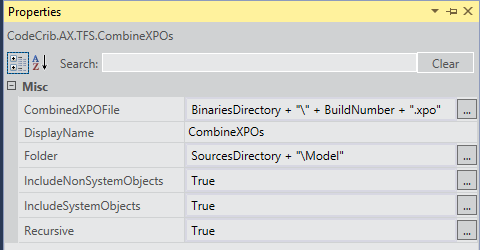
So, after the AOS is stopped, there is probably a bunch of things you can do in parallel. First, there’s the matter of combining all XPOs from source control into 1 big XPO file (purpose is to have only one command to import the XPO, and also use AX’s built-in logic to resolve dependencies between objects while importing). You can also call the “Clean” and “DeployReferences” activities, and then some other activity to either restore the database, uninstall the models, or do something of that sorts. Note that these activities may require the use of files (like the combine XPO activity). This is why we have the source directory and binaries directory stored in variables. A few more pointers to explain here:
- The “Sources Directory” is the root folder where the build will retrieve all files. As we will see in our build definition setup in the next part, you can map different source tree folders onto different folders within the sources directory. For our builds, we’ve assumed that we never store anything directly in the root, but a sub-folder for anything needed for the build. For example, the XPO files for the model will be downloaded inside a “\Model” folder. Any third-party DLLs we need for compiling will be stored in “\References”, etc.
- Any files that you put in the “Binaries Folder” will be copied into the “Drop Folder” for the build. Basically, that is the output of your build. We surely want the axmodel exported to go there, but it can be handy to store the full XPO there as well. Or, perhaps you can make a boolean argument to indicate whether or not you want the XPO in the drop folder.
- All property values are VB expressions, and the expected expression output type should equal the type of the property you are trying to set. So for the XPO file for example, you could set the “Folder” property to SourcesDirectory + “\Model”.
- Build number. If you want to provide the Build Number to the CreateModel activity - make sure to change your build number format to a.b.c.d in the build definition. We’ll get to that in the next part.
- For TFS 2012, the binaries and sources folders are already stored in variable names “SourcesDirectory” and “BinariesDirectory”. Other details of the build are stored in a class in variable BuildDetail. You can use BuildDetail.BuildNumber. See the IBuildDetail info on MSDN.
So, here are the properties for my CombineXPOs activity:
Again, for an explanation of all the properties, their defaults and their usage, check the reference page.
So, here is where I leave you to play with the activities in the workflow. I didn’t walk through a full workflow, however I prepared several built-out examples for different usage scenarios, from simple to very advanced. I hope you enjoy these examples, I’m planning to add a few more as well as improve the pages so you can see the properties on all the activities as well (as soon as I brush up on my JavaScript :-)
In the next part, we’ll dive into creating build definitions and some concepts around that.
Apr 9, 2014 - Easy Automated Builds - Part 2
Filed under: #daxmusings #bizappsIn Part 1 we looked at installing the TFS custom activities into the source tree, telling the build controller where to find the DLLs. Finally we also made sure Visual Studio can find our DLL files so we can edit workflows.
One of the major updates between TFS 2012 and TFS 2013 is the default workflow. One, it is stored differently. And two, the 2013 workflow has been simplified to basically a one-page workflow (TFS 2012 has pages and pages of collapsible workflow steps). To account for both, let me start with showing you where to edit the workflow. Again, 2013 is super-easy. I like to start with the bad news first, so let’s start with TFS 2012.
Also, before you continue make sure you have the custom activities DLLs available for Visual Studio, as explained in Part 1.
In TFS 2012, open your source control explorer and find the project you are building for. Each project will have a folder called “BuildProcessTemplates”. You will find a few workflows in there, including a “DefaultTemplate” with some version number appended to it. Double-click the Default Template XAML to open it. Once it’s open, from the File menu select SAVE AS and create your own name, such as AXBUILD.xaml or something more creative. Now, I’ve seen regular issues with Visual Studio giving errors on even the default workflow file. If you see any warning icons (red or yellow triangles with an exclamation point) or if you see any bright red error messages inside the workflow - just close and re-open the XAML file. I’m not sure if that is just my system, but regularly I have to open a workflow twice to make it load all perfectly.
Now that you’ve loaded the XAML file, you’ll notice how large it is. To find the spot we need to change (ie, where Visual Studio projects are being compiled), click the “Collapse All” link at the top right.
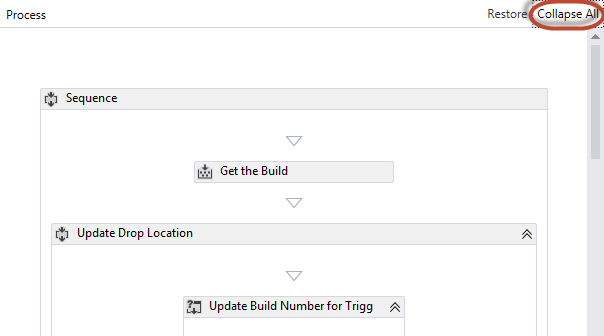
Now, one by one, open the nodes I’ll list out by clicking on the arrows.
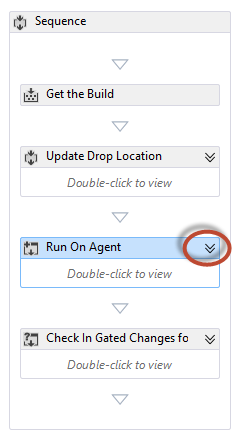
Open the following nodes, one inside the other:
- Run On Agent
- Try Compile, Test, and Associate Changesets and Work Items
- Sequence
- Compile, Test, and Associate Changesets and Work Items
- Try Compile and Test
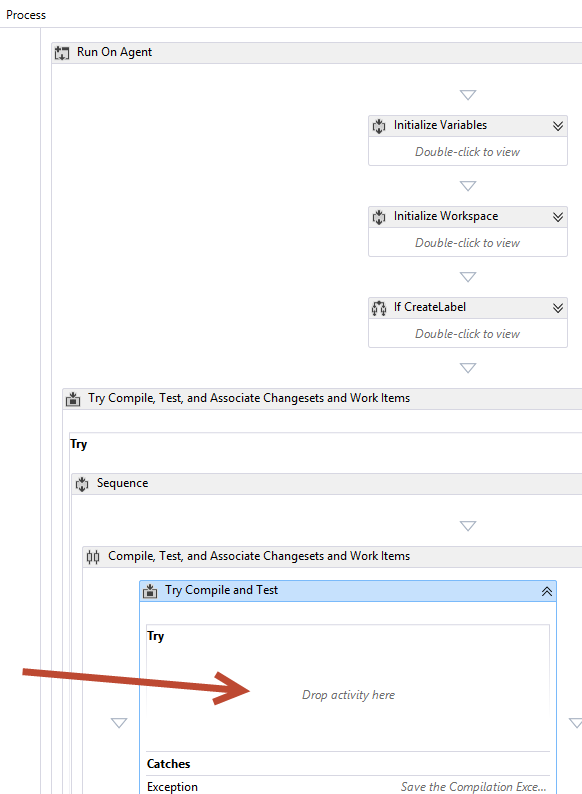
You could go down deeper and keep the testing piece in. This would allow you to actually make a generic Visual Studio test project part of your build, which can call into AX unit testing, as explained here. For the sake of simplicity here, I’ll stick to interjecting here (you’d need to go down a few more levels). At this point, you can delete the “Compile and Test” node entirely (leave the encompassing “Try Compile and Test”). This is the place where we will add our own Dynamics AX build workflow, inside the try compile and test. Note that the way the workflow is set up prior to where we stepped in, you will still need a solution file (.sln) for the build to work. You can just create a blank solution (without projects!) and add that into the source tree along side your code. In fact, just opening the XAML file without a project in Visual Studio will create a blank solution because VS needs context. If you look at your solution explorer you’ll notice VS has created a blank solution (probably “Solution1” or something) without any projects in it. You can just save that solution (give it a proper name) and put that in your source control tree. We’ll need it later when we setup a build definition.
In TFS 2013, the story is different. For starters, each project no longer has XAML workflows copied into it when you create it. There are default templates still, but they are stored on the server somewhere and not copied down to the project level. So, to customize a default template, we first need to grab it. To do this, we first need to start a new build definition, and we can download the default template from there. You need to get to “Builds”, and click the “New build definition” link. Technically you can work from any version of VS to connect to any version of TFS - however I was unable to grab the default template for TFS 2013 from any other version but VS 2013. If anyone knows how, please put it in the comments!
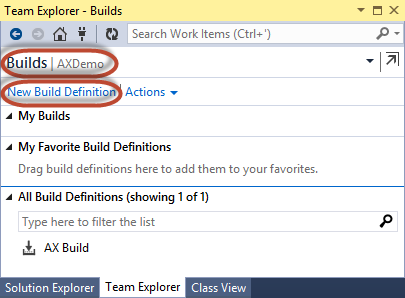
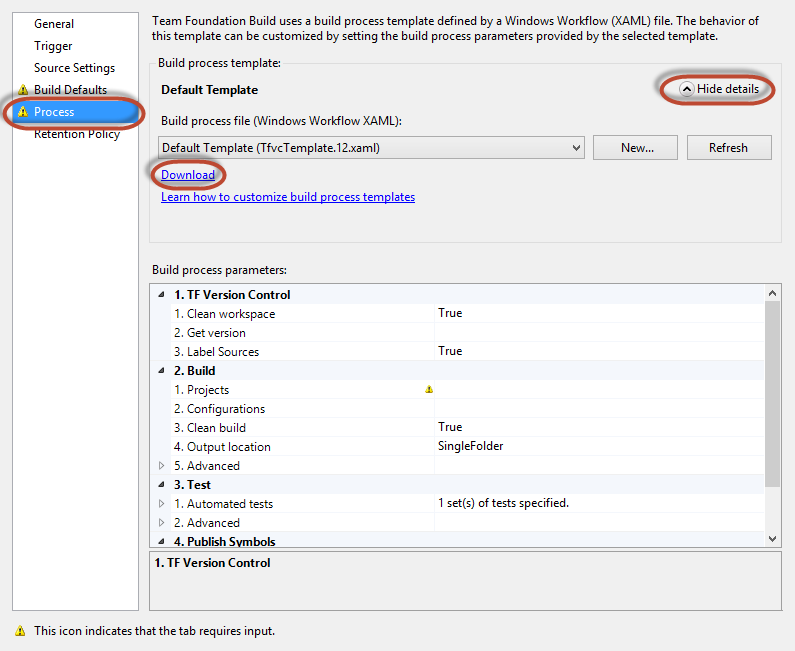
When you’re on the new build definition screen, go to the “Process” tab and click the “Show details” arrow. In the details you can click “Download”. Close the new build definition and don’t save it, we’ll come back to this later.
Now, open the XAML file you just downloaded. If you get any sort of error, close it and open it again. As I explained in the TFS 2012 section above, I’ve seen some interesting issues the first time you open a XAML file. Loading it a second time seems to load all dependencies correctly. Now, this workflow is a lot more condensed than the TFS 2012 one. What we are really looking for is the “Run on agent” > “Try” > “Compile, Test and Publish” section.
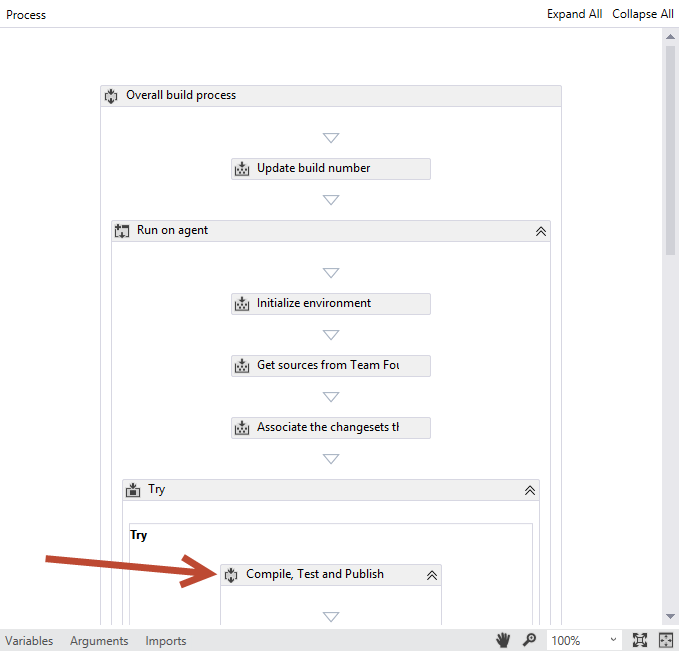
As with the TFS 2012 build, you can delete the whole Compile, Test and Publish structure and we can insert it there. If you want to include test projects (again, see TFS 2012 explanation above) you can drill down into this sequence and remove the msbuild compile steps with our Dynamics AX scripts, and leave the testing in. So, now you have another blank slate to start building our Dynamics AX build workflow!
Ready for Part 3, build a workflow!
Apr 8, 2014 - Easy Automated Builds - Part 1
Filed under: #daxmusings #bizappsI’m glad to announce updates to my Dynamics AX Admin Utilities, including a brand new build library. It’s been in use here at Sikich for quite a while now, and with our latest modifications I’m glad to release the binaries (although as always the code is available at any time). I want to make sure to thank my partner in crime, Dan, for helping me out with the code and the testing it here internally. I also got some good feedback from a fellow MVP, Kenny Saelen, who’s also implementing these activities and got me the final bits I needed to finally implement async. Thanks! Now, these activities can be used with or without TFS. Yes, that’s right. They are built against the TFS client libraries for optimal use with TFS. But I will show in an upcoming post that you can use these activities using regular .NET workflow as well.
The major difference with our previous activities is that these are 1) based on the work we’ve done around the admin utilities and 2) they are optimized for ease of use and minimal configuration of options. I will outline an example here using Team Foundation Server 2013 with AX 2012 R3. But note that we use the exact same libraries internally for AX 2012 RTM, AX 2012 FPK and AX 2012 R2 releases, using Team Foundation Server 2012. I’m fairly confident these activities will also work with TFS 2010 - however you may need to get the source and recompile the libraries against the TFS 2010 client DLLs. I will test this at some point. However, there is nothing special in the activities that is specific to TFS 2012 or 2013. I am pretty sure these activities will NOT work in TFS 2008 since a lot was changed in TFS going into 2010.
If you want to dive right in, download here. Reference documentation is here.
First, you’ll need to download the binaries from CodePlex. The TFS release package includes all the needed DLLs (basically the dependencies on the admin utilities). There are no separate versions for AX RTM vs R2 vs R3, and no separate versions for TFS 2012 vs 2013 (the DLLs are built against TFS 2012 and work fine with the 2013 DLLs). Once you have downloaded the zip file, you will need to put the DLLs in a project inside the TFS Project Collection where you will be doing builds. If you have multiple collections, you’ll need to put the DLLs inside each one.
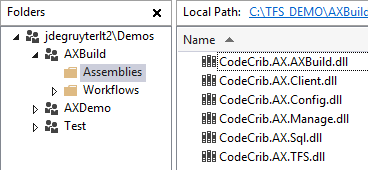
I chose to create a separate project called AXBuild and inside a folder called “Assemblies” I uploaded the activities. I doesn’t matter where exactly you put them, as long as they are in the source tree somewhere. Next, we need to go into the TFS Server Administration Console, open up the Build Configuration.
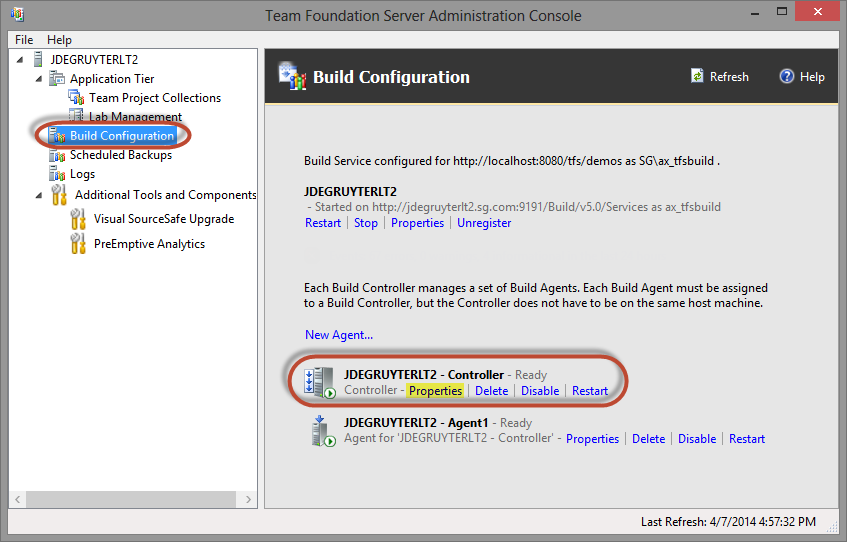
A few things to explain here. A build service is the process that accepts requests from clients to perform a build. A build controller orchestrates the builds and delegates the heavy lifting to a build agent. A build agent is the process that actually performs the build itself. An agent is registered with one controller only, the controller is tied to a service, the service is set on one specific project collection. You can run many services and controllers and agents, it’s just important to note the roles they play. If you are just playing around and have only 1 thing to do with TFS and that’s AX, you can stick with one collection, one service, one controller, and one agent :-) Now, if you haven’t installed a service/controller/agent yet, go ahead and run through the setup. If you have multiple agents (the default during install), you can run multiple builds at once. HOWEVER, keep in mind that each build will of course require its own AX AOS server! You don’t want two builds running and trying to use the same instance of AX. Next, the agents should be installed on the AOS machine, so that the build process runs on the same server as the AOS. We may support remote builds at some point, but right now that’s the way it goes - and it’s really not an issue. In our setup we have a build service and controller running on the same machine as TFS itself. Then, we have specific build machines that just run one agent, connected to the main controller.
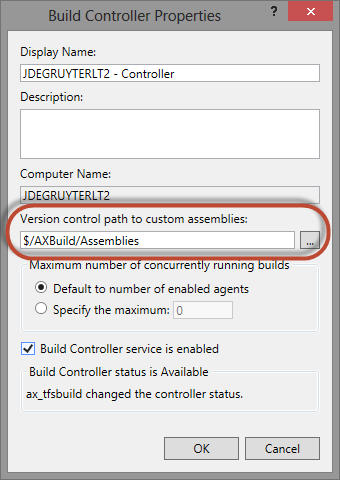
With that out of the way, the build controller is where we need to point to our custom activity assemblies. This of course means if you need these for multiple controllers, you’ll have to set each one up to point to the assemblies. Also, make sure you log on to the machine with the build controller - in case you run the agent on a different machine. On the controller, click the Properties link. On the dialog that appears, you can set the path to your custom assemblies. You can look up the correct path by clicking the ellipsis button there.
Click OK and that is all we need to do here. We’re now all setup and ready to create a build workflow. TFS has workflows that handle everything that is needed in a build. It creates a source label (if you don’t know what that is, no problem), it grabs all the code, associates the work items from the changesets to the build, etc. And of course, it runs the compile. Now, the default workflows that come with TFS of course assume that you will be compiling a Visual Studio project. So, we want to take one of these pre-built workflows, remove the visual studio compile stuff, and add in whatever activities you wish to use to build AX. Now, if you are using TFS 2013 (or Visual Studio Online), this is a WHOLE lot easier.
To edit the workflow, we will be opening a .NET workflow for TFS inside Visual Studio, and drag&drop our activities and set the properties. For this to work, Visual Studio needs access to the DLLs for the activities, of course. There are two ways to do this. You can just put the DLL files in the PublicAssemblies folder of Visual Studio ( in C:\Program Files (x86)\Microsoft Visual Studio 12.0\Common7\IDE\PublicAssemblies - replace your Visual Studio version with 10.0 for VS2010, 11.0 for VS2012 and 12.0 for VS2013). The other option is to actually create a VS project (let’s say a C# class library), add the DLLs as a reference, and open the workflow in the context of this project. I personally find it easier to copy the DLLs in the public assemblies folder, but that’s my choice.
We are now ready to create a workflow, which will be Part 2.
Jan 10, 2014 - How We Manage Development - Automated Builds
Filed under: #daxmusings #bizappsIt’s been a while so it’s about time I continue the “How We Manage Development” articles. If you missed it, I wrote about our architecture of TFS and Dev machines and how we organize TFS projects. Although we continuously adjust our methods and some of the details in those posts have changed, the essence still holds and I’m hoping you’ll find those articles a good read.
In this post I will focus on our build process and some specific issues I’m sure anyone who’s tried to do automated builds has encountered at some point. To get started, I need to explain we have two different build workflows. One is for a test environment, where we need to update an existing environment. The second is for models that need to be deployed to customers. The difference is that for a test environment, you can’t remove the existing code since that would result in data loss. The second does remove existing code as that would be equivalent to a “clean” action that every build process should do. Ultimately, the test build produces a model store export file (we don’t actually build in the test environment, we build somewhere else and then deploy the new modelstore), the release build process produces an model file.
Our current model for builds has changed over what we used to have. We used to have a separate (dedicated) AOS on each customer’s development VM that was just used for builds (we still have this process for AX2009 environments though). Today, for AX 2012 environments, we just have two dedicated build machines: one for 2012 RTM and one for 2012 R2. Yes, we support clients with all sorts of levels of updates, but consider that for compiles the only thing that matters is the code. So we always build with the latest kernel version (for example, R2 CU7), but we use the exact patch-level for each customer (for example, R2 CU5 with some custom hotfixes). To support this, the first step of our build process is to restore a correct database for the version we need to build (more on this later). Now, since we are using the latest kernel version, if we were to export a model store or model file we would have a version issue. So, we have a repository of AXUTIL versions for different kernel versions of AX, and the build will use the correct axutil version when it exports the model or model store. This sounds like a hack and I guess it sort of is, but it works perfectly so far. If we ever run into a CU that is somehow not compatible, we’ll have to setup a different build server for that specific CU going forward. Again, we have all levels of CUs across our customers and so far we haven’t had any compatibility problems. And the nice thing is, we can compile our <CU7 clients using the newer CU7 axbuild process ;-)
So what are the steps in our build process? Considering we are using the same physical machine and the same AOS instance for multiple clients on multiple versions with multiple sets of code, we have some precautions and failsafes in place.
-
Setup the AOS to use the right database. We used to flip the AOS configuration to point to a different database. We’ve changed this step now to just restore the database we need. This has the advantage of not needing the database already on the build machine’s SQL server (meaning we can setup new build machines and they’ll just pick up databases from a shared drive to restore). And it also saves space on the local SQL server on the build machines since we keep overwriting the same DB. This also has an advantage that we don’t run into any issues removing code first, as the database we’re restoring will be in working order. Sometimes removing models prior to starting the build can cause issues with synchronize or other things.
-
Do a “Cleansing” of the solution. Since the previous build may have been for a totally different application version or code base, we don’t want to have to deal with any remnants. So, we delete the XPPIL artifacts, VSAssemblies, Appl files such as labels, etc. Also on the client-side, we clean the VS Assemblies folder for the build user and delete AUC files.
-
Combine all the XPOs from source into 1 big XPO. You can use the standard Microsoft one provided at Information Source or you can write your own or use our simple open source one. At this point I’m guessing the Microsoft one will have some benefits but we still use our own simple one and it works great.
Now, here’s where we need some explanation of model store build versus model build. In the model store situation we are not going to uninstall the existing code. However, if we import the XPO with all the code, do we really want it to delete “sub-elements”? What if there is code from another model (in the same layer) that adds a method to the same class for example? If we import the XPO for our model, it will delete that method? We need it to be model aware, and XPOs just aren’t. So, to work around that issue, we use a temporary database… create our model, import the xpo, extract the model and then import that model into the actual model store. This will have the model import take care of deleting sub-elements, and that will be cleaner and take care of the model specifics. To save time we don’t compile or sync or anything in our temporary database, we’re just happy if the code is there.
-
Uninstall all models from all custom layers. Now that we restore database from scratch, we could skip this step. I guess we still have it in there :-) It doesn’t add much overhead except for the next step (5) which should be done if we do this step. For our temp database, or our actual database if we’re just building a model, we clean out all models in the custom layers (from ISV all the way up to USP). This is technically also part of a cleaning of the solution, as it makes sure there are no weird remaining artifacts from a previous build that will skew the compiler results. If we have dependencies on other models, we’ll reinstall those back in later. In some cases there may be several ISV models that can’t be installed cleanly together without merging. We have an option to exclude certain layers from being cleaned up, so that we can create a base database containing ISV products that we can restore, and then not remove those products. These should be exceptions as we want to start the build as close to standard AX as possible. Again, if we restore the database we could assume there’s nothing in it that needs to be removed…
-
Start AOS and synchronize. Since/if we removed code, we want to synchronize before we continue. If we don’t synchronize and re-import the code, IDs will be different but the DB will still have the old artifacts and IDs, resulting in synchronization errors later on. We have an option that for a temporary database import (as explained above) we can skip this step as we don’t care about synchronizing (and save a bit of time).
-
Stop AOS, deploy references, start AOS. for temporary databases, we skip this step for now and perform it later for the actual model store database. Lots of times code depends on external assembly DLLs (references). Since we are using the same machine to build all sorts of different environments and different versions, we shouldn’t (can’t) actually install the software or DLLs in the right places. Since we need them to compile the code, and the compile runs on the client under a specific user, we can copy all needed DLLs into the VSAssemblies folder for the build user. We store all the correct DLLs and correct versions with the project’s code in the source control repository. It makes sense, you version your dependent binaries as well. And that’s how we can get to them from any build machine. Also, our code may depend on third-party models. Since we deleted all models, we have to re-import them unless we have them pre-installed on the DB backup and have set the build to skip cleaning that layer. So, same as the DLLs, we have the dependent models in the source control tree, so they get pulled onto the build machine and we just install them into the model store we’re about to build.
-
Import labels. We import label files using the client executable and -StartupCmd=aldimport_filename but there are ways to do it with autorun as well I think. Now, a lot of people (including ourselves) have had numerous problems getting the AOS to grab new labels or create labels. Labels don’t show up, or old ones do but new ones don’t etc. Additionally, sometimes they do show up but if you export the model it doesn’t contain them. So, here’s the scoop on that: 1) make sure you have delete the old label files from the server appl folders. 2) (super-secret trick) after importing the labels we use an autorun XML file to call Label::flush to make sure the client/AOS flush the labels down into the model store so the export works.
-
Import the combined XPO file. Now, the combined XPO file doesn’t contain the VS projects, we deal with those separately. To import the XPO we use autorun. We used to use the client’s import xpo startup command but autorun has some advantages (including logging) and seems more stable.
-
Import VS projects. Technically you can convert VS project files into an XPO and import that. The standard combine XPOs tool doesn’t do this I believe, and we have had unreliable results importing VS project XPOs. So, alternatively we are using autorun to call SysTreeNodeVSProject::importproject. Now, Microsoft just told me about another trick where you can use the msbuild process to call the “add to AOT” on the project, as you would from VS manually. I have to figure out how to do this as it would probably solve a few remaining issues with import projects. But for any normal VS projects, the static call to importproject should work great, and that’s what we currently use successfully.
If we’re doing a temporary database to create a model to update a model store, this is where we stop and just export the model as-is without compiling. We then switch to the actual model store and import the model we just exported. Note that that will also correctly update the version number of the existing model.
-
Compile etc Now we’re back in sync with both types of builds. We run the X++ compile, generate CIL and run a sync. Here we just added the option to compile “traditionally” using the client, or using the multi-threaded axbuild utility in CU7. If any of the steps (compile, CIL) log any errors in their log file, we fail the build. If the sync fails somehow, we generate an error in the TFS build log, which results in a “partially succeeded” build.
-
Extract the code Now we can extract either the model store or the model file. Note that you never want to extract the model store from the build that cleaned out all the code first, since that will have all new IDs for all tables. That’s the exact reason why we have two distinct build workflows.
Obviously we use TFS, but it should be clear that these steps can just be incorporated into PowerShell scripts and run manually without using TFS build. All of the code we use for this is stored in a class library, which then has a TFS Workflow Activies front-end as well as a PowerShell front-end. We are close to finalizing the CU7 axbuild pieces and then we can do a major release of our utilities. But you can already get the code from our source repository on CodePlex.
Waw, what a wall of text. Hope it makes sense to someone :-) And for your reference, with the CU7 optimization this whole process (db operations / import code / compile X++ / generate CIL / synchronize / export model) this runs in less than 40 minutes.
Nov 6, 2013 - What You Need To Know About the 15-minute CU7 Compiler
Filed under: #daxmusings #bizappsIf you hadn’t heard yet, CU7 has been released for AX 2012 R2. Lots of things to get excited about (comparing reports anyone?), the thing I’m most excited about is the new compile optimization. We did a lot of work in the past to identify the bottlenecks and speed up the compile by minimizing those bottlenecks. If you’re on AX 2012 RTM, that’s your best bet. However, the main issue still remained: the compiler didn’t use more than 1 core and so didn’t scale with hardware.
So, no more! CU7 includes a new way to compile the X++ code (CIL is still the way it was). First, it eliminates the client altogether, which removes another communication bottleneck by taking the 32 bit client (and the communication with the AOS) entirely out of the picture. The other advantage to this is that the server component is a 64 bit process, allowing access to more memory. Secondly, it will spin up multiple processes to compile pieces of the X++ code, effectively using multiple cores.
There are a few gotchas that you need to be aware of, though.
By moving the compile into a 64-bit process, there are limitations to loading certain dependent client-side (32 bit) components for the compile. These could be ActiveX controls, COM objects or even DLLs and assemblies. To be able to do the compile, the compiler will use reflection on all these objects, effectively allowing it to check everything without having to actually load these components. Obviously to be able to check all these dependencies correctly, the compiler needs access to client-side components it typically does not have installed. To that end the compiler needs the path to a folder that contains all these dlls it may need. Typically pointing it to the folder of an installed AX client is enough. When calling COM objects in X++, you can “chain” the method calls (for example: COM.method1().method2(); ) relying on the fact that the first method call will return an object of a certain type on which you can call the second method. With the server-side compile, this chaining cannot be checked, so code has to be refactored into multiple calls (for example: o = COM.method1(); o.method2(); ). Note that you will run into this trying to compile a model store version prior to CU7 with the new compiler (SysInetHTMLEditor has calls like this that need to be fixed). Finally, because it starts multiple instances of the server process to do the compile, hotswapping needs to be turned OFF.
So, how does it work?
Well, first: check and make sure hotswapping is turned OFF! Next, open an elevated command prompt (“run as administrator”). Next, navigate to the server/bin folder which contains the axbuild.exe program. There are several parameters you need, one optional one controls the number of parallel processes it uses (aka “workers”). By default axbuild will create roughly 1.4 workers per core you have: I have 4 cores in my laptop (2 physical, total 4 virtual), so axbuild will start up 6 worker processes. I found that reducing that to 4 workers on my machine gained me about 10 minutes. So play with this a bit to find the optimal setting. Additionally you need to specify the AOS you are compiling for. This uses the AOS “instance number” on the machine you are on. On my laptop I’m testing this on my primary AOS which is “01” (yes you need the leading zero). Finally, as mentioned earlier, you need to provide the path to a binary folder containing client-side DLLs, so pointing it to the client/bin folder works great. My final command ends up being:
cd \Program Files\Microsoft Dynamics AX\60\Server\<YOUR AOS NAME>\bin axbuild.exe xppcompileall /aos=01 /altbin=”C:\Program Files (x86)\Microsoft Dynamics AX\60\Client\Bin” /workers=4
I’m currently running a laptop with 3GHZ i7 (2 physical cores / 4 virtual) with 16GB memory and an SSD drive, running AOS and SQL on this machine (and SQL constrained to 4GB memory). I consistently hit 15 minutes compile time.
As mentioned earlier, if you are planning to use this on CU6 or earlier, you will have to cleanup some COM calls. You will see these as compile errors in your compile log output, which will be located in C:\Program Files\Microsoft Dynamics AX\60\Server\<YOUR AOS NAME>\Log (you can specify an alternative path in the command line).
For more details on command line arguments and architecture, check out these two Microsoft links: AX Tools Blog about CU7 Parallel compiler MSDN Article on AXBuild
Sep 26, 2013 - Linq to AX Example using WPF
Filed under: #daxmusings #bizappsToday I decided to investigate and blog about a feature I haven’t tried since the beta of AX 2012 R2: the Linq connector. I do a quite a bit of C# work regularly, not related to AX, and Linq (along with WPF) is one of my favorite frameworks. So combining that with AX, seems like a perfect match to me.
For this example, I decided to do something basic. WPF allows easy binding, Linq allows querying and returns an IQueryable that you can bind to. In the past I’ve blogged about using WPF to bind to AIF services in my 10-minute app series. This time however, we’ll call our code from within AX and stay inside the AX client process and connection, which is where the Linq connector is working. You could use this over the business connector as well, just keep in mind that the BC technology is announced to be deprecated in the next release.
Unfortunately, there are several limitations and issues using Linq, and I’ll talk about those here.
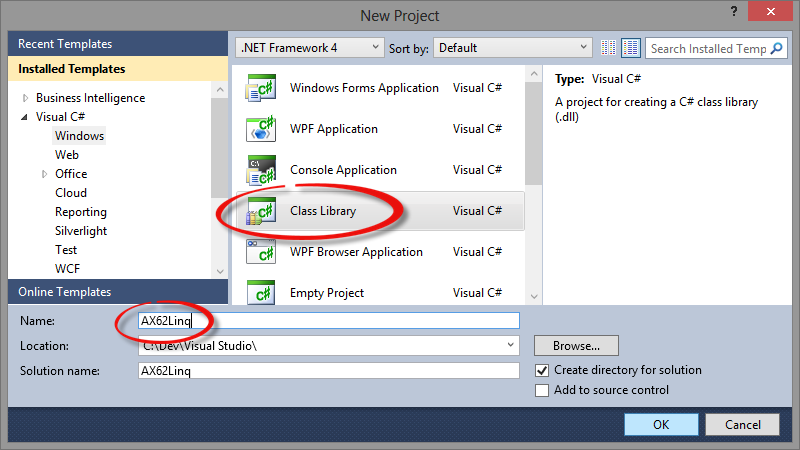
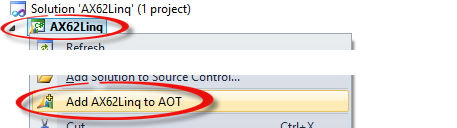
So, let’s dive right into it. Open Visual Studio 2010 (with the VS extensions for AX 2012 R2 installed). Again, this ONLY works on R2 and higher. In Visual Studio, create a new class library project, I’ve called my example “AX62Linq”. Once it has opened, add the project to the AOT as shown below.
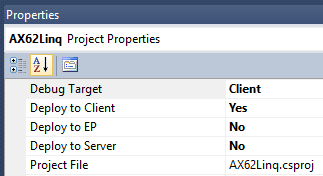
Once it’s added to the AOT, right-click on the project and select properties. In the properties window, make sure to set the “Deploy to Client” property to “Yes”. If you want to run and debug directly from Visual Studio, set the “Debug Target” to “Client”.
Next, we’ll create a WPF window control which we’ll call from within AX. On the project, right-click and click Add > New Item. Select WPF and create a new User Control (WPF) - don’t take the Windows Forms user control! I named my user control “CustomerSearch”.

Instead of a user control though, we’ll make this a full-on window. In the code CustomerSearch.xaml.cs code (expand the CustomerSearch.xaml in your solution explorer and double-click the CustomerSearch.xaml.cs file), change the inheritance from UserControl to inherit from Window instead.
Original:<pre>public partial class CustomerSearch : UserControl
{
    public CustomerSearch()
    {
        InitializeComponent();
    }
}</pre>
New:<pre>public partial class CustomerSearch : Window
{
    public CustomerSearch()
    {
        InitializeComponent();
    }
}</pre>
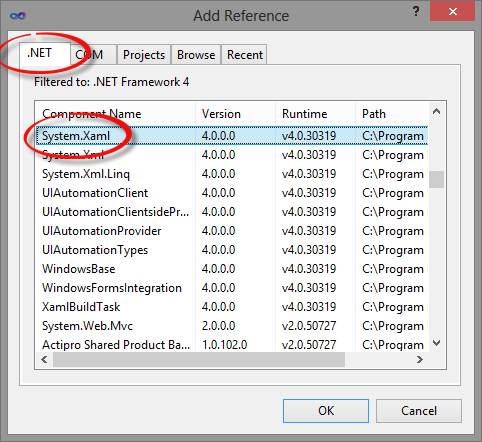
To support this, you also need to add a reference to System.Xaml.
In the designer of the CustomerSearch.xaml, let’s change the “UserControl” tag to “Window”.
Original:<pre><UserControl x:Class="AX62Linq.CustomerSearch"
             xmlns="http://schemas.microsoft.com/winfx/2006/xaml/presentation"
             xmlns:x="http://schemas.microsoft.com/winfx/2006/xaml"
             xmlns:mc="http://schemas.openxmlformats.org/markup-compatibility/2006"
             xmlns:d="http://schemas.microsoft.com/expression/blend/2008"
             mc:Ignorable="d"
             d:DesignHeight="300" d:DesignWidth="300">
    <Grid>
</Grid> </UserControl></pre></code> <code>New:<pre><Window x:Class="AX62Linq.CustomerSearch"
xmlns="http://schemas.microsoft.com/winfx/2006/xaml/presentation"
xmlns:x="http://schemas.microsoft.com/winfx/2006/xaml"
xmlns:mc="http://schemas.openxmlformats.org/markup-compatibility/2006"
xmlns:d="http://schemas.microsoft.com/expression/blend/2008"
mc:Ignorable="d"
d:DesignHeight="300" d:DesignWidth="300">
<Grid>
</Grid> </Window></pre></code>
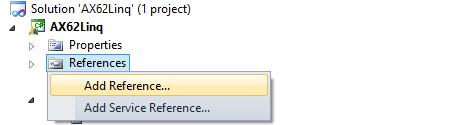
Next, we’ll add the references to the AX Linq libraries. Right-click references again and click “add a reference”, but this time we’ll have to browse to the DLLs we need. These DLLs are in the AX client’s bin directory, which by default on an 64-bit system is in c:\Program Files (x86)\Microsoft Dynamics AX\60\Client\Bin. Add the files Microsoft.Dynamics.AX.Framework.Linq*.dll On my current test system which is AX 2012 R2 CU6 I have three files, other versions may have different files or different number of files. The reason I say this is because the code example on MSDN seems to show a difference with my system.
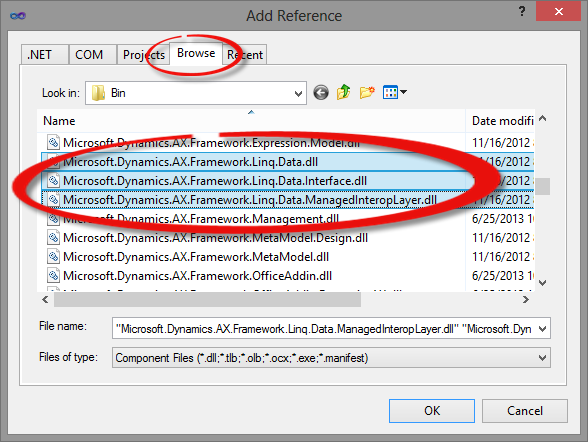
Alright, that’s a lot of “blah” for the little tiny bit of code we’re going to write, but here goes. First, we need to instantiate a query provider for AX. then, we create a query collection object for the table we want to query. That table should be a proxy to the table we’re interested in, so first, open the Application Explorer toolbar (from the Visual Studio menu: View > Application Explorer). Expand Data Dictionary / Tables and find CustTable. Right-click on CustTable and select “Add to project”. That create the proxy for you. You’ll need to declare some using statements at the top. Again I have a difference on my system versus the code example from MSDN referenced above. On my 2012 R2 CU6, here’s the using statements I added:
<pre>using Microsoft.Dynamics.AX.Framework.Linq.Data;
using Microsoft.Dynamics.AX.Framework.Linq.Data.Common;
using Microsoft.Dynamics.AX.Framework.Linq.Data.ManagedInteropLayer;
using Microsoft.Dynamics.AX.ManagedInterop;</pre>
That allows us to declare the query provider and query collection:
<pre>QueryProvider provider = new AXQueryProvider(null);
QueryCollection<CustTable> custTableCollection = new QueryCollection<CustTable>(provider);</pre>
Next, we can perform our query. If your familiar with Linq, it’s pretty much regular Linq, but there are a few restrictions. But, at least the basics work. For example, here I’m querying for all customers in a given customer group (specified in a string variable named “customerGroup”):
<pre>var customers = from c in custTableCollection where c.CustGroup == customerGroup select c;</pre>
This is where it gets a little bad. There’s an issue when both a method and a field have the same name. For example, the CustTable table we are using has both a field named “Blocked” and a method named “Blocked”. Now, the proxy generator for AX avoids this issue by naming the field “Blocked_” with an underscore. However, the Linq provider seems to not pick up on this correctly. So as soon as you try to use the customers list from the Linq query, you will receive an exception: System.Reflection.TargetInvocationException: Exception has been thrown by the target of an invocation. —> System.ArgumentException: The supplied method arguments are not valid. If you look through the stack, you’ll see it go down to the interop layer and linq libraries, starting with Microsoft.Dynamics.AX.ManagedInterop.Record.createFieldExpressionNode(String fieldName). Luckily, C# features anonymous types, and as handy as they are with Linq in general, they are a must to solve our problem here. So, let’s change our Linq query to not return CustTable types, but rather a new anonymous types containing only the fields we want (and… only fields that don’t have a method with the same name). As for the ugly part: if anyone ever decides to add a method with the same name as one of your fields, I guess you’re done. Below I create a new anonymous type containing the account number and the delivery mode fields).
<pre>var customers = from c in custTableCollection where c.CustGroup == customerGroup select new { c.AccountNum, c.DlvMode };</pre>
An option to this whole mess would be to remove the methods that are causing the conflicts from the generated proxy file. Unfortunately, by default a rebuild of your project will regenerate the proxy code. If you want to try that out anyway, right click on a declaration of “CustTable” in your code (for example in the QueryCollection
Anyway, back to the good! Let’s create our XAML window and try this out, shall we? Open the CustomerSearch.xaml file by double clicking on it. In the XAML code, inside our <Grid> tag which is currently empty, we’ll define some rows and columns for layout, but most importantly we’ll then add a TextBox named “CustGroup” and a button to perform the search. Finally, we add a ListView named “CustomerList” with a GridView inside of it. The GridView we bind to “AccountNum” and “DlvMode” which are the two fields we are returning from our Linq query. The final xaml code looks like this (note that if you named your project and XAML control differently, the x:Class declaration at the top in the Window tag should be preserved as you have it!):
<pre><Window x:Class="AX62Linq.CustomerSearch"
             xmlns="http://schemas.microsoft.com/winfx/2006/xaml/presentation"
             xmlns:x="http://schemas.microsoft.com/winfx/2006/xaml"
             xmlns:mc="http://schemas.openxmlformats.org/markup-compatibility/2006"
             xmlns:d="http://schemas.microsoft.com/expression/blend/2008"
             mc:Ignorable="d"
             Title="Customer Search"
             Width="300"
             Height="300"
             d:DesignHeight="300" d:DesignWidth="300">
    <Grid Margin="5">
        <Grid.ColumnDefinitions>
            <ColumnDefinition Width="Auto" />
            <ColumnDefinition Width="*" />
            <ColumnDefinition Width="Auto" />
        </Grid.ColumnDefinitions>
        <Grid.RowDefinitions>
            <RowDefinition Height="Auto" />
            <RowDefinition Height="*" />
        </Grid.RowDefinitions>
<TextBlock Grid.Row="0" Grid.Column="0" Text="Customer Group Search: " />
<TextBox Grid.Row="0" Grid.Column="1" Name="CustGroup" />
<Button Grid.Row="0" Grid.Column="2" Content="Search" Name="SearchBtn" Click="SearchBtn_Click" />
<ListView Name="CustomerList" Grid.Row="1" Grid.ColumnSpan="3">
<ListView.View>
<GridView>
<GridViewColumn Header="Account Number" DisplayMemberBinding="{Binding AccountNum}" />
<GridViewColumn Header="Delivery Mode" DisplayMemberBinding="{Binding DlvMode}" />
</GridView>
</ListView.View>
</ListView>
</Grid> </Window></pre></code>
Now, note that the SearchBtn button has a click event handler called SearchBtn_Click, which we need to create. So let’s move on to the code. Open up the CustomerSearch.xaml.cs again. First, we’ll add a method that takes a customer group string, performs the Linq query and sets the result set as the item source for our list view (the control we named “CustomerList”).
<pre>public void LoadCustomers(string customerGroup)
{
    QueryProvider provider = new AXQueryProvider(null);
    QueryCollection<CustTable> custTableCollection = new QueryCollection<CustTable>(provider);
var customers = from c in custTableCollection where c.CustGroup == customerGroup select new { c.AccountNum, c.DlvMode };

CustomerList.ItemsSource = customers; }</pre></code>
Finally, we create another method for the button click, which we have to name the same as what we put in the XAML, “SearchBtn_Click” in the example from above. All we’ll do is grab the text from the “CustGroup” textbox and pass it into our method for Linq:
<pre>private void SearchBtn_Click(object sender, RoutedEventArgs e)
{
    LoadCustomers(CustGroup.Text);
}</pre>
At this point, we’re all done. You can do Build > Rebuild Solution and Build > Deploy Solution and we can go into AX to call our code. For the purpose of speeding this up, I just created a quick and dirty job:
<pre>static void Job1(Args _args)
{
    AX62Linq.CustomerSearch myWindow;
myWindow = new AX62Linq.CustomerSearch();
myWindow.ShowDialog(); // this waits for exit }</pre></code>
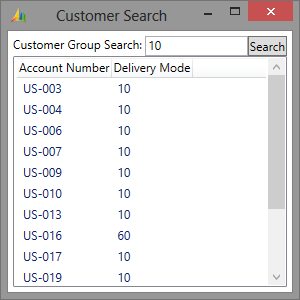
If all went well, here’s what you should get. I entered “10” as a filter which should give you some customers in the standard CU6 demo data. If you want to go advanced you can go back to Visual Studio and from your Application Explorer make the job you create your “Startup Object” (and make sure you have debug target “client” set on your project, as explained in the beginning). This will allow you to just hit F5 from within Visual Studio which will start AX and run the code (and allow you to debug easily without needing to manually attach the debugger to the ax client). You can go back to my Developer Resources page and find some of the Visual Studio articles if you want to know more about those features.
Ok, so what have we learned today.
The good: Getting the linq queries to work is pretty easy, just add the reference, a proxy and get started. Basic linq queries work well and perform as expected. Since it’s IQueryable you can use the linq results as datasources for binding etc. Although I didn’t demonstrate that here, joins between tables work just as well. Look at the MSDN code example if you’d like to see that.
The bad: Some linq query syntax is not available. For example, looking for customer account numbers that contain “abc” doesn’t work. In Linq you would filter in the where clause: where c.AccountNum.Contains(“abc”) but that won’t fly for the AX proxies. Normal filters where a field equals a string, or where a number is larger or smaller than another number work just fine.
The ugly: A lot of standard tables have fields and methods with the same names. This causes major issues and you won’t be able to query these fields at all unless you copy/paste the proxy code into your own CS file (and remove the proxy) and remove all the methods that cause the issues. Of course then you’re disabling the benefit of the rebuild refreshing your proxy with new code and fields, so you’re on your own for maintaining the proxy code.
Blog Links

Blog Post Collections
- The LLM Blogs
- Dynamics 365 (AX7) Dev Resources
- Dynamics AX 2012 Dev Resources
- Dynamics AX 2012 ALM/TFS
Recent Posts
-
From Text Prediction to Action
Read more... -
The Killer App
Read more... -
The AI Software Pipeline
Read more... -
The Software In Charge of AI
Read more... -
From Text Predictor to Chatbot
Read more...