ISV Licenses in Packages
ISV licenses for Dynamics 365 F&O can only be applied using deployable packages. There are ISV license packages that only contain a license, and there are combined packages that have both the binaries as well as the license. But now with all-in-one packages on self-service environments, you can only apply the license as part of an all-in-one package. So what are your options? Check out my YouTube video and/or read on for more details.
ISV licenses are essentially just text files. As far as packages go they just need to appear in the right folder inside the zip file, and the deployment will see this and apply the licenses. If you want to deal with this manually, you can just put the text file in the correct location in any deployable package and you’re off to the races. I’ll talk about that towards the end but, this wouldn’t be my blog if we didn’t use automation and Azure DevOps first!
The official Azure DevOps extensions for Dynamics 365 F&O have a task for adding licenses to an existing package. You can install the Azure DevOps extensions from here, and the task can be added to the legacy build VM pipeline, the new pipeline or even a release pipeline. It only needs two things: the actual license file(s), and a deployable package to add it to. This will add the license files to every package you create, which is perfectly fine and avoids you having to keep track of which package where/when was applied with or without licenses. Official documentation here.
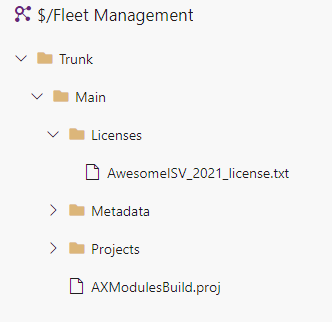
In this example, let’s add some license files to source control in a new folder called “Licenses”. I’m creating this folder at the same level as “Metadata” and “Projects” so it should get mapped correctly on the build.
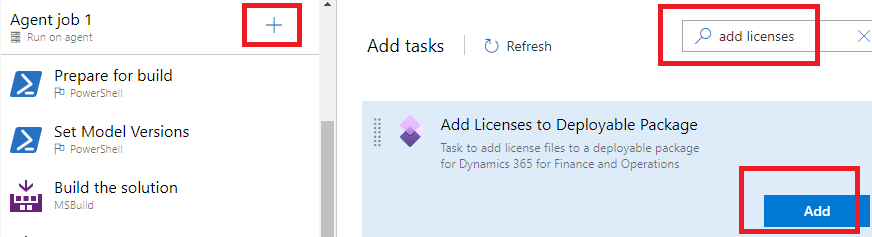
Next, add or enable the task to add licenses. On a legacy pipeline, after installing the Azure DevOps extensions, click the plus icon at the top to add a task, and search for “add licenses”, then click add. Make sure to drag it after the “Generate Packages” task, since you need the package to exist to be able to add a license.
On the new pipeline the task is there already, but disabled. Just right-click it and select “Enabled selected task(s)”.
Next, you can use any of the Azure DevOps file matching options to find the license we just added to source control. Assuming you followed this article, you can just tell it to pick up any *.txt files from the “License” subfolder of the sources directory, or $(Build.SourcesDirectory)\Licenses\*.txt

Finally, on the new pipeline the default name/location for the deployable package to add it to will work out of the box. On the legacy pipeline though, you’ll have to change the deployable package path and name… First, the path to the package includes a sub-folder called “Packages”. Second, the package generated by the legacy pipeline includes your current platform’s build number in the filename. The easiest way is to just look at a package that was produced by your build, and copy/paste the version number. Sadly, this also means you would need to update this every time you update the build VM. Let’s presume your current build number is 7.0.5746.35600, you should change the path and name to:
$(Build.ArtifactStagingDirectory)\Packages\AXDeployableRuntime_7.0.5746.35600_$(Build.BuildNumber).zip
You can change the classic pipeline to use the new generate packages step like the new build, to avoid the platform version number issue. But that’s for another blog post.
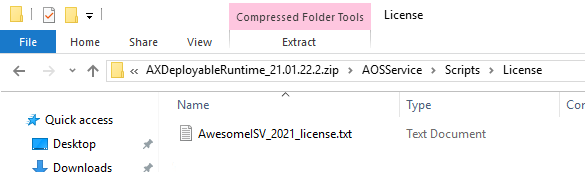
You’re all set at this point. Run a build, and you should see the license file show up inside the deployable package zip file under AOSService\Scripts\License. Note that that is obviously also how you can do this manually, just add the license files in that location (AOSService/Scripts/License) in the zip file manually.
Check out the YouTube video for a quick runthrough of all these steps.