Use The New Packaging in the Legacy Build Pipeline
The legacy pipeline from the build VM has its own PowerShell script that generates the packages. However, it always puts the F&O platform version into the package file name which can make it more difficult to use release pipelines or including ISV licenses into your packages since the version number changes with each update, requiring you to update your pipeline settings (and finding out the actual build number to use). Continue reading below or watch the YouTube video to learn how to swap the packaging step from the legacy pipeline with the Azure DevOps task which lets you specify your own name for the deployable package zip file. You can find the official documentation on the packaging step here.
Before we get started it’s important to note the functionality of the PowerShell script in the legacy pipeline and compare it with the Azure DevOps task, so let’s do that first.
The legacy package creation step works like the rest of the pipeline, and takes everything from your source control automatically. This includes any checked-in ISV binaries as well. To avoid packaging unit test code (for example), it has an option to supply a list of packages to exclude. The new packaging task does not make any assumptions, and asks you to specify names and/or locations where there are packages you wish to include. Since it uses the Azure DevOps search pattern (official documentation here), you can use wildcards and exclude/include patterns.
Additionally, the legacy packaging step also exports models (source code) to axmodel files. Most customers likely have no use for these, but partners and ISVs may. If you need this, you will have to add an extra step to export models as the packaging step only, well, packages.
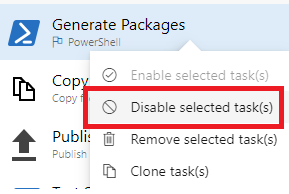
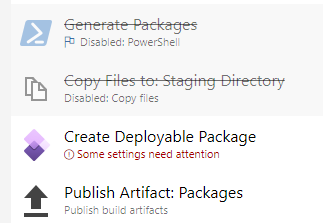
To start let’s disable the existing packaging step, then add the new packaging task. You can right-click the existing task and select “Disable selected task(s)”. To add the new task, make sure you have the Azure DevOps extensions for Dynamics 365 Finance and Operations installed. You can install them from the marketplace here. Click the plus sign at the top of the task list to add a new task, then search for “create deployable package” and click the “Add” button. Drag the new task to the same spot as the original packaging step (before or after the disabled one, doesn’t matter of course). You can also disable the “Copy Files to: Staging Directory” step as we’ll create the package directly in the staging folder.
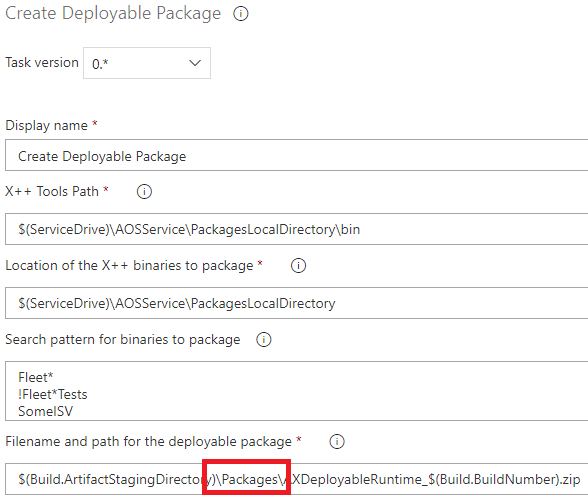
On the options for the task, it requires the path to the “tools”. On the new pipeline, this would point to the location of the Compiler Tools nuget package. On the VM, we can point this to the location of the PackagesLocalDirectory\bin where all the tools are located. The drive letter is typically K: in the cloud and C: for VHDs, but in general it’s good to not depend on this and there is actually an environment variable on these VMs that shows the correct location: SERVICEDRIVE. We can use Windows environment variables like any AZDO variable. The path for the tools would come out to:
$(ServiceDrive)\AOSService\PackagesLocalDirectory\bin
Note that on the VHD I was testing with, the ServiceDrive environment variable was not a system-wide variable, but only for the admin user. As a result, the build couldn’t find it. If you’re doing this on a VHD, either add the system-wide environment (search start for “This PC”, right-click properties, “Advanced System Settings”, button “environment variables”) or just hard-code the paths here to C:
Now comes the tricky part. Location of the X++ binaries to package… This is the folder to which your search criteria will be applied if they are relative. The legacy pipeline compiles straight into the AOS folder where all packages are. We could point this location to the PackagesLocalDirectory here: similar to the previous location of tools, we can use the service drive environment variable and point this option to $(ServiceDrive)\AOSService\PackagesLocalDirectory but we need to make sure to then specify all packages we want to include explicitly and not keep the wildcard * (because that would cause it to package up the whole packages local directory folder, which would include Microsoft packages… oops). In the example below, we look for any packages starting with Fleet (Fleet*), exclude all packages using that prefix but ending in “Tests” (!Fleet*Tests), and finally including a package called SomeISV (which could for example be an ISV binary that came in from source control and got copied into the packages folder). Of course you’ll want to substitute this with your own packages. Hopefully if you have multiples it’s a manageable number if you can use the wildcard like this example. If you have a really long list of packages, you may want to rethink why that is. (I should do a blog post on that some time…) This does imply that you will need to update this list if you add any new packages, unless of course it uses the same prefix and gets found with the wildcard. Note that on a physical disk level, this search is looking for folder names for the packages. That may be relevant to know if you’re trying to figure out special search criteria for your situation.
Finally, the publish artifacts step on the legacy pipeline expects the package to be created in a subfolder of the artifacts staging directory called “Packages”. So make sure to edit the filename and path for the deployable package to include a Packages folder, as shown in the screenshot below.
And that’s it…!
Bonus round! If you want to add a step to also export AxModel files, the command to export a model is pretty simple:
.\modelutil.exe -export -metadatastorepath=SOURCECODEROOTPATH -modelname=MYMODELNAME -outputpath=FOLDERTOEXPORTTO
Of course you’ll need the names of all models. You can hardcode those, or you could add some script to loop over all xml files in Descriptor folders (from the source folder instead of PackagesLocalDirectory, to avoid exporting all models including Microsoft’s). With PowerShell, you could do something like the following with the PowerShell inline task:
$modelNames = @(Get-ChildItem "$(Build.SourcesDirectory)\Metadata\*\Descriptor\*.xml" | ForEach-Object { $_.BaseName })
$modelNames | ForEach-Object { & "$(ServiceDrive)\AOSService\PackagesLocalDirectory\bin\modelutil.exe" -export -metadatastorepath="$(ServiceDrive)\AOSService\PackagesLocalDirectory" -modelname="$($_)" -outputpath="$(Build.ArtifactStagingDirectory)\Packages" }
Thanks for reading. If you’re interested, I walk through these steps with some extra commentary on YouTube here.