 Menu
Menu
Microsoft Dynamics 365 / Power Platform - page 5
Aug 20, 2013 - XLNT - A Most "Excellent" Framework for X++
Filed under: #daxmusings #bizappsAlthough demonstrated and praised quite a few times by Master Obi-Wan Villadsen and his team, the XLNT framework is still a little-known framework that contains a lot of power. So much so that the static code analysis (aka “Customization Analysis”) in the Dynamics Lifecycle Services almost solely based on the XLNT framework.
So what is the XLNT framework exactly? XLNT basically allows us to hook into the X++ compiler to get the parsed code and run analysis and diagnostics. How do you get XLNT? There’s no XLNT download in itself, but the XLNT framework is used for the Code Upgrade Service. You can download the Code Upgrade Service from InformationSource (you need to be a Dynamics Customer or Partner) and browse to the SERVICES page. Or you can just click this link. When you’ve download the package, you can just open the EXEcutable with your favorite compression utility (or you can run the installer) and the only files you really need for this article are:
Microsoft.Dynamics.AX.Framework.Xlnt.XppParser.dll Microsoft.Dynamics.AX.Framework.Xlnt.XppParser.Pass2.dll
Feel free to play with the rest, but it requires models to be installed etc to do the code upgrade service. So for the purpose of what we’re talking here, those two DLLs are all we need.
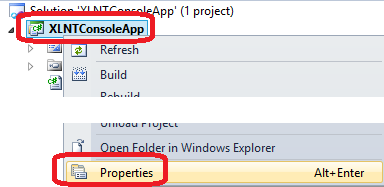
So, to make both the coding and this article a bit easier, I’m going to stay entirely in Visual Studio. XLNT does need the AX “context” so if we won’t be running this in AX but entirely in .NET from Visual Studio, we’ll use a business connector session to provide the context we need. I love XAML as a UI for test apps, but considering this is a blog and not everyone is familiar with XAML, I will just use a console app so avoid distracting from what we’re trying to do with XLNT. Once you create your project, right-click on the project node in the solution explorer and select properties.
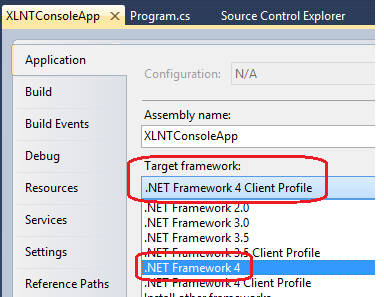
Next, we need to change the Target framework to .NET Framework 4 (default is client profile 4.0).
Finally, the AX assemblies are built against .NET Framework 2.0. If you would try to run it as-is, you’ll get an error saying that “Mixed mode assembly is built against version v2.0.50727 of the runtime and cannot be loaded in the 4.0 runtime without additional configuration information”. The “additional configuration information” has to happen in the app.config of your console app. If you’re making a class library for use inside of the AX process, this shouldn’t be an issue at all. But in a standalone app like this console app, open the app.config and add the attribute useLegacyV2RuntimeActivationPolicy=”true” to the startup node, so your app.config xml file should look like this:
<pre><?xml version="1.0"?>
<configuration>
  <startup useLegacyV2RuntimeActivationPolicy="true">
    <supportedRuntime version="v4.0" sku=".NETFramework,Version=v4.0"/>
</startup>
</configuration>
</pre>
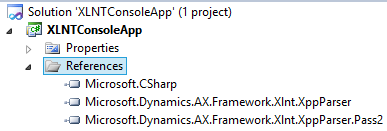
Let’s get down to it. I’m working in VS 2010 for this example. This would allow me to add any code to the AOT later if I wanted to use this code from within AX. Create a new C# console application, I’m calling it XLNTConsoleApp. In the solution explorer, right-click references and first add references to the XLNT dlls mentioned before. It doesn’t matter where you have them stored, Visual Studio will copy them into your solution by default.
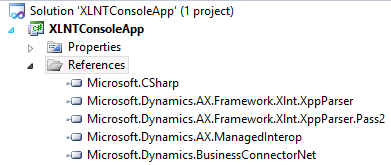
Additionally, we’ll need to reference the business connector so that we can provide the AX session context needed for XLNT to work. Assuming you have the business connector installed (if not, please do so :-)) you can find the DLLs in your client/bin folder (default is C:\Program Files (x86)\Microsoft Dynamics AX\60\Client\Bin). The files you need are: Microsoft.Dynamics.AX.ManagedInterop.dll Microsoft.Dynamics.BusinessConnectorNet.dll
After that, we’re ready to write some code. First, we’ll load up a connection to AX using the business connector. Alternatively to all of this, you could just create a class library project, add it to the AOT, and then call the code from an X++ job or so. So, to account for both, let’s try and detect if we have an AX session context already (if we’re running from within AX) and if not, we’ll create one (uses BC.Net). In your Program.cs locate the static Main method and add the following code, which looks for a runtime context and checks if you’re logged in, if not it makes a BC connection. Of course, we do some basic exception handling.
<pre>static void Main(string[] args)
{
    Microsoft.Dynamics.BusinessConnectorNet.Axapta ax = null;
try
{
    // Check for a RunTimeContext.Current, which will exist if we're running this
    // from within the AX process
    if (Microsoft.Dynamics.AX.ManagedInterop.RuntimeContext.Current == null
        || Microsoft.Dynamics.AX.ManagedInterop.RuntimeContext.Current.isLoggedOn() == false)
    {
        ax = new Microsoft.Dynamics.BusinessConnectorNet.Axapta();
        // Supply all nulls to use the Client Configuration settings for Business Connector
        ax.Logon(null, null, null, null);
        // alternatively, use the line below to specify a config file
        //ax.Logon(null, null, null, @"C:\path_to_my_config\configfile.axc");
    }
}
catch (Exception ex)
{
    Console.WriteLine(ex.Message); // output the exception message
    Console.ReadLine(); // pause execution before we quit the console app
    return;
}

try
{
    // [CODE WILL GO HERE]
    Program.BasicTest("void test() { if (true) { info('hello, world'); } }");
}
catch(Exception ex)
{
    Console.WriteLine(ex.Message); // output the exception message
}

if (ax != null)
{
    ax.Logoff();
    ax.Dispose();
}

Console.ReadLine(); }</pre></code>
Note the line that says // [CODE WILL GO HERE]. That is where we will be introducing our experiments with XLNT. For now, let’s create one basic method for you to experiment with until the next article :-)
<pre>static void BasicTest(string sourceCode)
{
    ProxyMetadataProvider metaData = new Microsoft.Dynamics.AX.Framework.Xlnt.XppParser.Pass2.ProxyMetadataProvider();
    MultipassAdministrator multipassAdmin = new MultipassAdministrator(metaData);
Method method = multipassAdmin.CompileSingleMethod(sourceCode) as Method;

if (method != null)
{
    foreach (Statement statement in method.Statements)
    {
        Console.WriteLine(statement.ToString());
    }
} }</pre></code>
This will create a metadata provider and a “multipass administrator” which basically let’s you compile things. We’ll give it some source code to compile which we pass in as a string. Note that you can point it to AOT objects etc. Finally, we’ll loop over the statements in the method. Note that statements can be nested. The Statement class is a base class for different types of statements, which will all have different properties for sub-statements etc (eg the if statement (“IfStmt” class) has an expression statement and a “consequent” property).
You can explore the statements by adjusting the sourceCode input and putting a breakpoint inside the foreach loop, for example. Of course, you still need to actually call this new method, so in the [CODE WILL GO HERE] section you can put the following:
<pre>Program.BasicTest("void test() { if (true) { info('hello, world'); } }");</pre>
Note that a compile error will not result in an exception but rather it will just return null instead of an actual method instance.
Alright, now you’re ready to do something interesting with XLNT! We’ll explore more in the next article, but if you’re doing some exploratory work of your own, please post in the comments!
Aug 1, 2013 - Auto-Deploying DLLs and Other Resources - Part 2
Filed under: #daxmusings #bizappsIn the first post of this series on deploying resources, I discussed the framework and some of its issues we’ll have to deal with. In this article, we’ll actually write the code to support that article.
Note that I also posted an “intermission” to that blog post based on some reader feedback. The article explains how to use a manually edited (aka hack :-)) Visual Studio project to have AX deploy resources through the AOT VS project framework. It works great, but there’s always the possibility that an undocumented “feature” like that may be killed in an update.
So, back to the file deployer framework. We’ll create a new class called “CodeCribDeploy” and we’ll extend “SysFileDeployment”.

As soon as you save the code, you’ll notice 4 compile errors complaining you need to implement a few of the abstract methods:
- filename
- parmClientVersion
- parmServerVersion
- destinationPath
You can right-click the class and override each of these. They will still error out on the super() call since that would be calling an abstract method. Just get rid of the super() call for now if (like me) the errors bother you. Let’s start with the method “destinationPath”. This indicates where you will store the files you’re deploying. This requires some consideration. Users may not be local admins on the machine and may not have enough privileges to put the files anywhere. On the other hand, for DLLs you want to make sure they are in a path where AX will look to load assemblies from. As an alternative to client/bin I like to use the same folder that AX uses to deploy AOT VS project artifacts too, which is in the user’s appdata folder as explained in this article. Feel free to change, but for this example that’s where we’ll put it. So ultimately, my destinationPath method looks like this:
<pre>protected FilenameSave destinationPath()
{
    return strFmt(@'%1\%2', j
        CLRInterop::getAnyTypeForObject(System.Environment::GetEnvironmentVariable('localappdata')),
        @'Microsoft\Dynamics Ax\VSAssemblies\');
}</pre>
I ask .NET for the System Environment variable “localappdata” and append the folder for the VSAssemblies. Interestingly, the sourcePath() method is not abstract and doesn’t need to be overridden. Unfortunately, although it returns the path to the include folder, it runs the code on the client tier and so it returns the wrong value. So, we’ll need to write a method to grab the server include folder on the server tier, then change the sourcePath method to return that value. Note I’m using the server include folder (default location is C:\Program Files\Microsoft Dynamics AX\60\Server[YOURAOSNAME]\bin\Application\Share\Include) because I think that makes sense, but feel free to change this. So this is what we’re adding to our CodeCribDeploy class:
<pre>protected static server FilenameOpen serverIncludePath()
{
    return xInfo::directory(DirectoryType::Include);
}
protected FilenameOpen sourcePath() { return CodeCribDeploy::serverIncludePath(); } </pre></code>
Next, the filename. Since there’s only one filename, this implies you need a class for each file you wish to deploy. I’ve personally just created a base class with all the overrides, and then just inherit from that for each file, just changing the filename method’s return value. So, we’ll just enter the filename. In this case I’ll deploy “MyDLL.dll”.
<pre>public Filename filename()
{
    return 'MyDLL.dll';
}</pre>
The next two methods to override are “parmClientVersion” and “parmServerVersion”. Interestingly these don’t seem to be used much by the framework at all. In fact, the only reference is from the base class SysFileDeployment.getClientVersion() and SysFileDeployment.getServerVersion() who seem to just get the version from their parm method. Interestingly, the framework calls the isClientUpdated() method which by default only checks to see if the file exists on the client side. Not helpful. So, let’s implement these methods to actually return some useful information on the versions, then we’ll fix isClientUpdated to actually use these versions properly. There are different things you can do, including using the .NET framework to get actual assembly version numbers from your DLL, but we’ll go with the cheap version and just check timestamps of the files. Note that we need to run these checks on their respective tiers, ie we need to get the server version by running code on the server tier and the client version by running a check on the client tier. since we’re just check file properties (timestamp), we can use the WinAPIServer class to check stuff on the server. Unfortunately, that class demands the FileIOPermission, which means we have the assert that permission on the server tier prior to the calls to WinAPIServer. Since our class will be running client-side, we’ll have to create a static server method which we can call from the parmServerVersion.
<pre>protected server static anytype ServerFileVersion(str filename)
{
    date serverDate;
    TimeOfDay serverTime;
new FileIOPermission(filename, 'r').assert();

if (WinAPIServer::fileExists(filename))
{
    serverDate = WinAPIServer::getFileModifiedDate(filename);
    serverTime = WinAPIServer::getFileModifiedTime(filename);
}

return strFmt('%1T%2', serverDate, serverTime); }
public anytype parmServerVersion() { str filename = strFmt(@’%1\%2’, this.sourcePath(), this.filename());
return CodeCribDeploy::ServerFileVersion(filename); }
public anytype parmClientVersion() { str filename = strFmt(@’%1\%2’, this.destinationPath(), this.filename()); date clientDate; TimeOfDay clientTime;
if (WinAPI::fileExists(filename))
{
    clientDate = WinAPI::getFileModifiedDate(filename);
    clientTime = WinAPI::getFileModifiedTime(filename);
}

return strFmt('%1T%2', clientDate, clientTime); }</pre></code>
So now we’ll override the “isClientUpdated” method to actually perform a version check:
<pre>public boolean isClientUpdated()
{
    return this.parmClientVersion() == this.parmServerVersion();
}</pre>
Note that here I’m checking if the client and server versions are equal. So if the server version if older, it will return false here and prompt the client to download the older version. That may or may not be what you want.
We also need to make sure the framework picks up on our file to be “checked”. It unfortunately doesn’t look at subclasses of the base class to determine that automatically. You’re supposed to add your classNum as part of a return value of the filesToDeploy() method. If you’re reading this and wanting to implement this for AX 2009, you need to over-layer this method and add your class. If you’re on 2012, you have a better option: events! Right-click on your CodeCribDeploy class and click New > Pre- or post-event handler. Let’s rename this method to “filesToDeployHandler”. We’ll get the method’s return value, add our class ID to the container, and set the return value back.
<pre>public static void filesToDeployHandler(XppPrePostArgs _args)
{
    container filesToDeploy = _args.getReturnValue();
filesToDeploy += classNum(CodeCribDeploy);

_args.setReturnValue(filesToDeploy); }</pre></code>
Finally, we just drag&drop this new method onto the filesToDeploy method of the SysFileDeployer class. Make sure to give the new subscription a meaningful and unique name (or otherwise you’ll defeat the clean purpose of using events in the first place). Also make sure to set the properties of the event subscription (right-click your new subscription node, select properties) to “Post” event.
Great, all set, right?! Well, there’s one more “fix” we have to perform, as discussed, to make sure our file versions are always checked. To do this, either change the code in the “parmUpToDate” method to always return false, or if you’re on AX 2012, again you can use events. By making parmUpToDate return false we force AX to check the versions, as it should. This can be as easy as adding another pre/post handler as we did before, and changing the return value to false.
<pre>public static void parmUpToDateHandler(XppPrePostArgs _args)
{
    _args.setReturnValue(false);
}</pre>
And obviously we need to drag&drop this onto the parmUpToDate method of the SysfileDeployer class, and set the CalledWhen property to Post.
Make sure to save the whole lot. Now, when you open a new AX client, you should get the following dialog:

If you don’t see it, make sure you put your DLL to be deployed in the right folder, for the right AOS. Yeah, that’s what I did.
Jul 31, 2013 - Custom Query Range Functions using SysQueryRangeUtil
Filed under: #daxmusings #bizappsYou’ve probably seen these requests before. Users want to submit some report or other functionality to batch, and the query should always be run for “yesterday”. It’s a typical example where, as a user, it would be handy to be able to use functions in your query range. Well, you can. And in fact, you can make your own, very easily!
Enter the class “SysQueryRangeUtil”. All it contains is a bunch of static public methods that return query range values. For example, there is a method called “day” which accepts an optional integer called “relative days”. So, in our example of needing a range value of “tomorrow”, regardless of when the query is executed, you could use day(-1) as a function. How this works in a range? Just open the advanced query window and enter your function call within parentheses.
Let’s make our own method as an example. Add a new method to the SysQueryRangeUtil class, and enter the following, most interesting code you’ve ever encountered.
<pre>public static str customerTest(int _choice = 1)
{
    AccountNum accountNum;
switch(_choice)
{
    case 1:
        accountNum = '1101';
        break;
    case 2:
        accountNum = '1102';
        break;
}

return accountNum; }</pre></code>
So, this accepts an options parameter for choice. If choice is one (or choice is not specified), the function returns 1101, if 2 it returns 1102. Save this method and open a table browser window on the CustTable table. Type CTRL+G to open the grid filters. In the filter field for the AccountNum field, enter: (customerTest(1)).
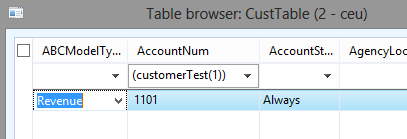
So, the string returned from the method is directly put in the range. So, you could do all sort of interesting things with this, of course. Check out some of the methods in the SysQueryRangeUtil as examples.
Jul 19, 2013 - Auto-Deploying DLLs and Other Resources - Intermission
Filed under: #daxmusings #bizappsI posted part 1 of the auto-deploying DLLs and other resources article last month. Although I will finish the part 2 article as promised, an interesting comment and subsequent email discussion / testing has prompted me to include this “intermission”.
The deployment framework has existed throughout quite a few versions of AX. when AX 2012 was released and we were all drooling over the Visual Studio projects in the AOT, one thing became clear: referenced DLLs within the project are not deployed like the DLLs built from the project. I tried quite a few options in the properties of the references to get the DLLs copied to the output folder etc, but nothing worked. Additionally, deploying other files from your project (images etc) doesn’t work either. But, one attentive reader of this blog, Kyle Wascher, pointed out a way to edit your Visual Studio project file to have it deploy files to the output folder. Interestingly, AX honors these settings as opposed to honoring the regular properties in the VS project file. So, here’s how you do it!
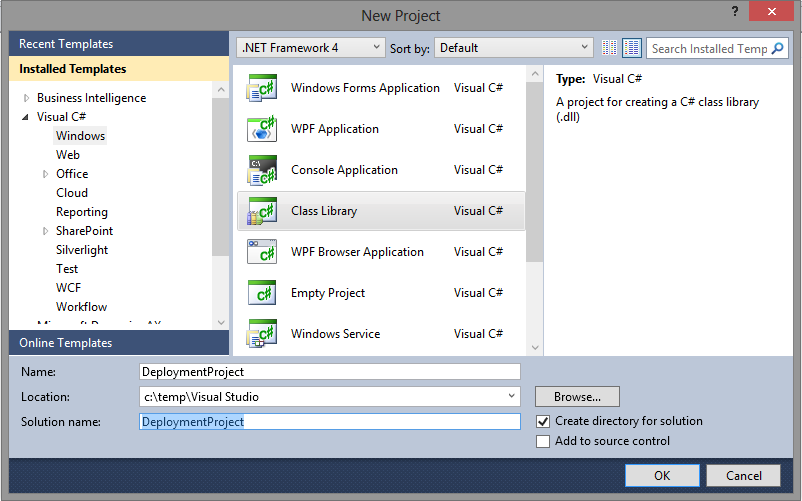
First, let’s create a new project in Visual Studio 2010. I’m choosing the Class Library project type, and I’m naming it “DeploymentProject”.
Once created, right-click the new project and select “Add DeploymentProject to AOT”.

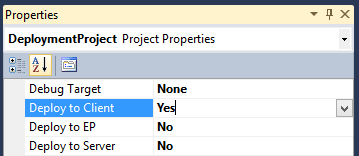
Right-click on your project and select “Properties”. Make sure to select “Deploy to client” (or deploy to server or client or EP or all of them, depending on your scenario). For this test I’ll just set Deploy to client to YES.
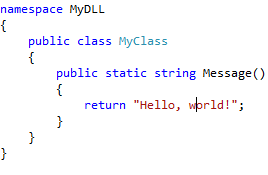
Of course, we need a DLL to deploy. I’m going to create a new project/solution but of course that is NOT a requirement, you can pick any DLL you have created anywhere or downloaded from third parties. Shift-click on Visual Studio in your Windows taskbar to start another instance of Visual Studio. Create new project,again I pick the Class Library project type, and I’m naming it MyDLL. After this, my project looks like this. Again, creating this new project is just an illustration of a DLL we’ll deploy, it’s not needed to make this work. As an illustration for later, MyDLL contains a public class MyClass with a public static method “Message” that returns the string “Hello, world!”. Since the code is irrelevant I’m just putting a screenshot up here. On a side note, it seems if you create another project within the solution where you create the AX VS project, the new project will also be added to the AOT, which of course defeats what we are trying to do here.

Make sure to build this DLL so we can use it.
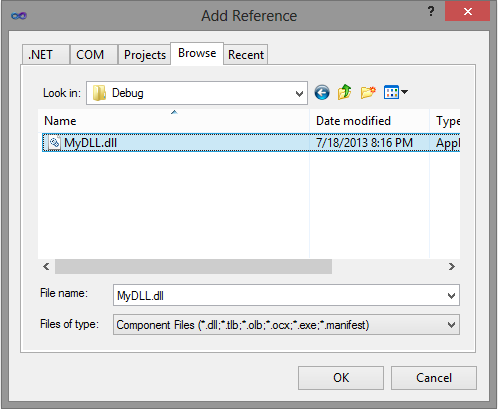
Ok, so now there are two ways to have the DLL be part of your project. One, you add it as an actual reference. Or two, you just add it to your project as a regular file. In this example, I will add the DLL as a reference in the project. This will allow me to actually also use the DLL in the project itself, which I will use further down as an example. This is also the most common scenario where one needs to deploy an extra DLL. So, go back to your AX VS Project “DeploymentProject”, right click the references node in your deployment project, and click “Add reference”. On the “Add Reference” dialog click the Browse tab and navigate to the MyDLL.dll we built in the other project. You’ll find that DLL file in your project’s folder under bin/debug or bin/release depending on which configuration you used to build.

Ok, open the File menu and select “Save all” to make sure we’ve saved our project. Time to get our hands dirty and “hack” the Visual Studio project :-) Right-click on your project and select “Open folder in windows explorer” (or manually browse to your project folder). Find your .csproj file (in my case it’s DeploymentProject.csproj) and open it in notepad or your favorite text editor (depending on your OS you may or may not have a “Open with” option, you may have to right-click or shift-right-click, it all depends… if all else fails, just open notepad and open the file from within notepad). Find the XML nodes called ItemGroup and add your own ItemGroup as follows:
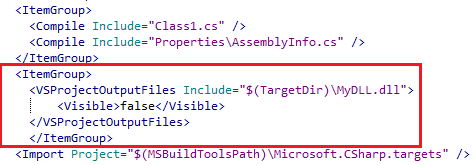
A few things there. By using $(TargetDir) as the path, we’re telling Visual Studio/AX to find our extra DLL in the folder where this CURRENT project’s DLL is being built. This is important, since it will make sure that wherever the project is compiled, we’ll always find MyDLL.DLL correctly. By default when you add a reference, VS will set the “copy local” flag to yes, which will make sure the referenced DLL is available. Save the csproj file and switch back to Visual Studio. You should get the following dialog:

This is exactly what we need. Click “Reload”. Now, we’ve edited the VS project on disk but it’s not in the AOT yet. Normally, VS updates the AOT any time you click save. Unfortunately, in this case you just reloaded the project from disk so VS doesn’t actually do anything when you hit save, as it doesn’t think you’ve changed anything. So, the easiest thing you can do is just click the “Add DeploymentProject to AOT” option again, as we did in the beginning. This will force an entire update of the project to the AOT. Ok, so now (remember I had “Deploy to Client” set to yes) I will just open the AX client. And as explained in my article on VS Project DLL deployment, you should see both the DeploymentProject.dll and the MyDLL.dll files appearing in your Users\youruser\AppData\Local\Microsoft\Dynamics Ax\VSAssemblies.
Now, as for using the code of MyDLL. Remember we added a class and method there. However, the DLL is referenced in the VS project, but not in the AOT. So, your code inside DeploymentProject.dll can use that class, but your X++ can only use the code from DeploymentProject.dll. If you need access to the MyDLL.dll code from X++, you will need to manually add a reference to that DLL in the AOT still. Now, at that point you point it to the location of the DLL, but at runtime (or after you deploy the code to a test or production environment using models) AX will just try to load the DLL from its known search paths, which will include the VSASSemblies folder in your appdata. So as long as you include the AOT reference as part of your model, this trick will work everywhere.
As a final note, you can use this to deploy ANY file. You can right-click your project and select “add / existing item” and select a JPG file for example. In the properties of the file, make sure to set the “Copy to Output Directory” flag to “Copy always”. Then, just add another VSProjectOutputFiles node in your csproj file.
Jun 29, 2013 - R2 Hotfix for Compile Time needs Schema Update
Filed under: #daxmusings #bizappsJust a quick note on the hotfix that was released quite a while ago to improve compile times on R2. Many blogs including the official Microsoft one linked directly to the hotfix, and many people have installed it immediately with no result. What many people don’t seem to know (and honestly in my own haste to try it out I did the same thing at first) is that you need to update your model store schema to benefit from the improvements which included new indexes in the model store. So, if you have installed the hotfix (KB2844240), make sure to run “axutil schema” on the model store to actually make the changes take effect!
Jun 20, 2013 - Dynamics AX Admin Tools - CodeCrib.AX.Config
Filed under: #daxmusings #bizappsYesterday I released code libraries and a wrapper PowerShell cmdlet libraries to automate installs of AX and maintain client and server configurations for AX. I also blogged an example of an installer script to have an automated install of an AX 2012 AOS. The download links for both libraries are:
CodeCrib.AX.Setup CodeCrib.AX.Config
Today I will give you an example of the Config library and how we’re using it. You can find reference documentation of the commands for the Config library here.
The point of the config library is to create and maintain configuration files. For example, when we auto-deploy an AOS for development, we can run a script that will change the AOS to have debugging and hot-swapping enabled. For the client side, we can generate client configuration files to log into the development workspace and in the correct layer. Both server and client config objects expose all the properties that you see on the configuration utilities. Before anyone comments, the big missing piece here is the “Refresh configuration” that exists on the client configuration utility. I’m working on finding out how to get that configuration easily.
So this one script takes care of both AOS and client configs. The first part of this script gets parameters in for the PowerShell script and loads the library. Next, it gets the active configuration (after initial install this is the “original” configuration). It changes the configuration name to equal the AOS name (I like this as a convention on our VMs), sets breakpoints on server, sets hotswapping, and save the configuration back (by piping the config object into the Save-ServerConfiguration cmdlet). Next, it uses Set-ServerConfiguration to set that new configuration as the active one for our AOS instance.
<pre>Param(
    [parameter(mandatory=$true)][string]$instancename,
 [parameter(mandatory=$true)][string]$VARcde,
 [parameter(mandatory=$true)][string]$CUScode,
 [parameter(mandatory=$true)][string]$configfolder
    )
import-module ((Get-Location).Path + "\CodeCrib.AX.Config.PowerShell.dll")
$config = Get-ServerConfiguration -aosname $instancename -active $config.Configuration=$instancename $config.BreakpointsOnServer=1 $config.HotSwapping=1 $config | Save-ServerConfiguration -aosname $instancename Set-ServerConfiguration -aosname $instancename -config $config.Configuration</pre></code>
Next, we move on to the client configuration. Just like the server configuration, initially you are stuck with the “original” configuration. We just retrieve that one (it’s the active one), set user and global breakpoints, and save out the config three times (for three layers: USR, VAR, CUS).
After that we repeat the process but we add the -Development startup command and create config files for each layer to log into the development workspace.
<pre>$config = Get-ClientConfiguration -active
$config.UserBreakPoints=1
$config.GlobalBreakPoints=1
$config.Layer=”usr” $config.LayerCode=”” $config | Save-ClientConfiguration -filename ($configfolder + “" + $instancename + “_usr.axc”)
$config.Layer=”var” $config.LayerCode=$VARcode $config | Save-ClientConfiguration -filename ($configfolder + “" + $instancename + “_var.axc”)
$config.Layer=”cus” $config.LayerCode=$CUScode $config | Save-ClientConfiguration -filename ($configfolder + “" + $instancename + “_cus.axc”)
$config.KernelStartupCommand = “-Development”
$config.Layer=”usr” $config.LayerCode=”” $config | Save-ClientConfiguration -filename ($configfolder + “" + $instancename + “_usr_Development.axc”)
$config.Layer=”var” $config.LayerCode=$VARcode $config | Save-ClientConfiguration -filename ($configfolder + “" + $instancename + “_var_Development.axc”)
$config.Layer=”cus” $config.LayerCode=$CUScode $config | Save-ClientConfiguration -filename ($configfolder + “" + $instancename + “_cus_Development.axc”)</pre></code>
We can probably shorten this into a loop of sorts, but this is easy to read and understand at this point.
Bonus round:
You could ask, how about actually creating a shortcut to start AX and pass the config file? I haven’t worked out that code yet (I’ll leave it as “an exercise for the reader” :-) but basically you can use WScript.Shell for that. I haven’t gotten past one issue with this (just haven’t had the time) where the target path validates the path’s existence. If you add the configuration file as a parameter in there, it basically fails to validate that whole string (including config file) as a valid target path. Either way, you can play with this but the following PowerShell script is where I left it last time I considered it:
<pre>$shell = New-Object -COM WScript.Shell
$shortcut = $shell.CreateShortcut("C:\Users\Public\Desktop\Powershell Link.lnk")
#$shortcut.TargetPath=('"c:\Program Files (x86)\Microsoft Dynamics AX\60\Client\Bin\Ax32.exe" "' + $configfolder + "\" + $instancename + '_cus_Development.axc"')
$shortcut.TargetPath="c:\Program Files (x86)\Microsoft Dynamics AX\60\Client\Bin\Ax32.exe"
$shortcut.WorkingDirectory="c:\Program Files (x86)\Microsoft Dynamics AX\60\Client\Bin\"
$shortcut.Description="AX link with config file"
$shortcut.Save()</pre>
Note how the commented line causes the error. So this will now create a shortcut to AX without the config file. I’ll let you know when I figure this out :-)
For now, that’s it on the admin tools. I’m actively working on this code base, so expect more updates in the next weeks!
Jun 19, 2013 - Dynamics AX Admin Tools - CodeCrib.AX.Setup
Filed under: #daxmusings #bizappsLong overdue for release, I’m glad to announce the first beta of my admin tools. These tools are still a work in progress, but you can start taking advantage of these right away. As you probably know, we have open sourced our TFS build scripts for Dynamics AX, and ever since these were released I’ve received quite a few emails and messages from people asking how to automate deployment etc outside of TFS. Obviously we do some of that already inside the build scripts, and there’s some code sharing that can be done. Additionally, we’ve been exploring SCVMM (System Center Virtual Machine Manager) for which we would like to automate a lot of things (such as installing AX, deploying code, etc). So, in an effort to refactor and support TFS builds as well as automated scripts or even your own tools (UI?), I embarked on a mission to create a set of admin tools. This first beta release features less than half of the final product, but it’s a good start and it’s what we’ve been using for SCVMM so far (more on that in another post).
So, today’s release includes a code library (which you can use to create your own tools) and a wrapper PowerShell cmdlet library to automate installs of AX and maintain client and server configurations for AX. The downloads are:
CodeCrib.AX.Setup CodeCrib.AX.Config
Today I will give you an example of the Setup library and how we’re using it. You can find reference documentation of the commands for the Setup library here.
Dynamics AX has always allowed silent installs using parameter files which you can pass to the setup executable of AX. For our VMM setup I wanted to make this even more generic and needed some good tools to support parameterized, automated installs. Additionally, a log file generated after an install of AX actually leaves you with most of the parameters you actually used (the exceptions are passwords are not stored in the log file).
All of this is captured in the library CodeCrib.AX.Setup and the PowerShell CmdLets CodeCrib.AX.Setup.PowerShell . The download also contains a sample UI which lets you load a log file and write it out as a parameter file, or load a parameter file and manipulate it. Note that the UI is just an example of how to use the class library in your own projects, I’m not planning on maintaining that much but will instead focus on the library and PowerShell cmdlets instead. The following is an example of the PowerShell script we currently have in use for installing an AOS:
<pre>Param(
    [parameter(mandatory=$true)][string]$setuppath,
 [parameter(mandatory=$true)][string]$databaseserver,
    [parameter(mandatory=$true)][string]$instancename,
 [parameter(mandatory=$true)][string]$aosaccount,
 [parameter(mandatory=$true)][string]$aosaccountpw
    )
import-module ((Get-Location).Path + "\CodeCrib.AX.Setup.PowerShell.dll")
$env:instance = $instancename
$setupparams = get-parameters -filename ((Get-Location).Path + “\AX2012 Server.txt”) $setupparams | set-parameter -environmentvariables
| $setupparams | set-parameter -parameter “DbSqlServer” -value $databaseserver |
| $setupparams | set-parameter -parameter “AosAccount” -value $aosaccount |
| $setupparams | set-parameter -parameter “AosAccountPassword” -value $aosaccountpw |
$setupparams | start-axsetup -setuppath $setuppath </pre></code>
Basically, the PowerShell script accepts some basic information such as the path to the setup executable, the SQL server name, a name for a new AOS server (and it will reuse that as the name of the database assuming you follow convention and what to keep those the same), account and password to use for the AOS service. Obviously this is abbreviated and it’s specific to just installing an AOS. I will post more examples in future posts. But basically, this loads the PowerShell cmdlets, loads the parameter file (AX2012 Server.txt) and then 1) replaces the %instance% environment variable, and sets the db / aos / password in the parameter object and starts the AX setup.
Tomorrow I will show you an example PowerShell script for the CodeCrib.AX.Config.PowerShell library, to create some standard configuration files to get into layers, development workspace, etc. Enjoy!
May 28, 2013 - Auto-Deploying DLLs and Other Resources - Part 1
Filed under: #daxmusings #bizappsIn my article on .NET Assembly Deployment in AX 2012 we reviewed how assemblies are deployed for Visual Studio projects as well as the CIL generate for X++. However, there are several scenarios one can think of where you want to deploy files outside of that. For example, you are releasing a DLL but don’t want to provide the source, in which case you can’t add the VS Project to the AOT. Other scenarios are files not related to code execution, for example icons or other resource files. In this article we’ll look at a framework in AX that supports doing this, and it has actually existed for multiple versions of AX already: SysFileDeployer.
Let’s start with a scenario. We have a .NET assembly (DLL) we need for use on the client side. We could optionally copy this DLL file into every user’s client/bin folder, but that’s not very convenient. If we need to make an update, we’ll need to update all the clients as well. So, we want to auto-deploy these files to the client. Additionally, the question is WHERE do we put the files on the client side? Putting it in the client/bin would be one option, but there’s a few potential issues. For example, what if the user doesn’t have write privileges to that folder? (it’s in program files after all). For auto-deploying VS projects, AX has created a VSAssemblies folder in each user’s directory, and AX actually looks there to load DLL files. So we can exploit that and put our DLLs there as well. I’ll go with that in this example, but of course you’re free to do what you want. Second decision is, where do we put the files to begin with? The best way in my opinion is the share/include folder on the AOS. Each AOS bin directory has an Application\Share\Include folder which already contains some images and other things to be shared. For example, my default AOS “AX60” has those files in C:\Program Files\Microsoft Dynamics AX\60\Server\AX60\bin\Application\Share\Include . We’ll have the AOS load the files from there, and transfer them to the user’s AppData\Local\Microsoft\Dynamics AX\VSAssemblies folder.
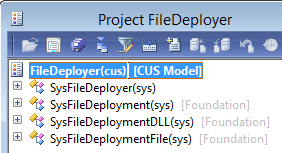
To start off, I’ll create a new X++ project called FileDeployer and add some of the existing AX classes in there. I’ll add classes SysFileDeployment, SysFileDeploymentDLL, SysFileDeploymentFile and SysFileDeployer.
Now, if we debug this framework (for example, put a breakpoint in the MAIN method of the SysFileDeployer class and restart your AX client) we can figure out how this works. Unfortunately, you’ll soon figure out that this framework has an issue right from the start - but of course nothing we can’t fix. Anyway, the SysFileDeploy class a static method called “filesAndVersions” which will get a list of classes (that have to inherit from SysFileDeployment) that will tell this framework which files we wish to deploy. Obviously that will be the first thing we need to customize. Next, it will loop over that list of classes, instantiate each class and call the “getServerVersion” method. The end result is it returns the list of classes with the version on the server side. This method will be called from the “isUpTodate” method on the file deployer class, then it creates an instance of each class again - this time on the client side, sets the server version it got earlier, then calls the “isClientUpdated” method. The idea is that the isClientUpdated method actually checks the version on the client, and compares it with the server version that was retrieved earlier. It all makes sense. Then from the main method in the file deployer it will call the run method on each file deployment class if it determind one file was out of date. So a few issues here. One, if one file needs to be updated, it seems to be downloading all of them. I don’t think that’s a big issue considering these files are typically not large (and if they are, you may need to reconsider how you’re deploying these). The biggest issue though is the check for the parmUpdate() method in that main method. It’s basically checking a stored version from SysLastValue. So any time files are updated, that flag is set to true and stored for next time. Unfortunately, the check for that flag in the main() method is at the beginning of the IF statement, meaning this thing will only run once in its lifetime, to then never run again. Without customizing this framework, the easiest thing I could think of to get around this (in AX 2012 anyway, you’re stuck with customizing in AX 2009) is to add our “isUpdated” logic as handlers to the parmUpToDate method and change the return value if we need to update. If anyone has any better ideas or solutions to this issue, please let me know (put in comments or contact me).
Alright, in the next article we’ll start the code.
May 1, 2013 - Mixing Dynamic and Static Queries with System Services in AX 2012
Filed under: #daxmusings #bizappsIn the “old” blog post about using WPF connected to the query service in AX, we talked about consuming a static query and displaying the data set in a WPF grid. The goal there was to be able to whip this up very quickly (10 minutes?!) and I think that worked pretty well. In this post I’d like to dig a bit deeper. I’ve received some emails and messages asking for examples on how to use the dynamic queries. Well, I will do you one better and show you how to use both interchangeably. We will get a static query from the AOT, change a few things on it, and then execute it. All with the standard system services!
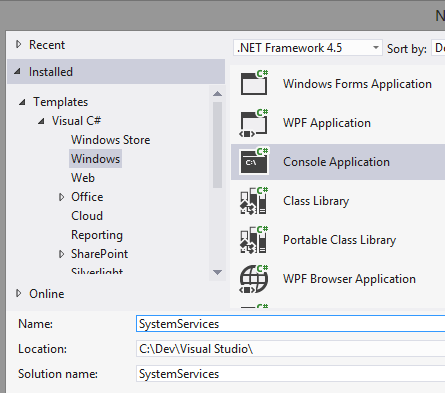
So, we will first use the metadata service to retrieve the AOT query from AX. In this example, I will be using Visual Studio 2012, but you should be able to run through this using Visual Studio 2010 just fine. We start by creating a new Console Application project. Again, we’ll be focused on using the system services here, but feel free to use a WPF app instead of a console app (you can merge with my previous article for example). I’m in Visual Studio 2012 so I’m using .NET 4.5, but you can use .NET 4.0 or 3.5 as well.
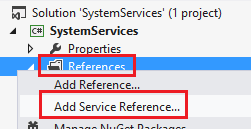
Next, right-click on the References node in your solution explorer and select Add Service Reference.
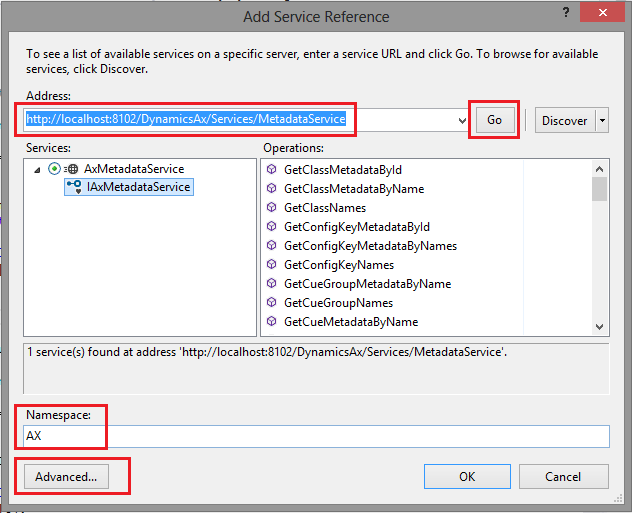
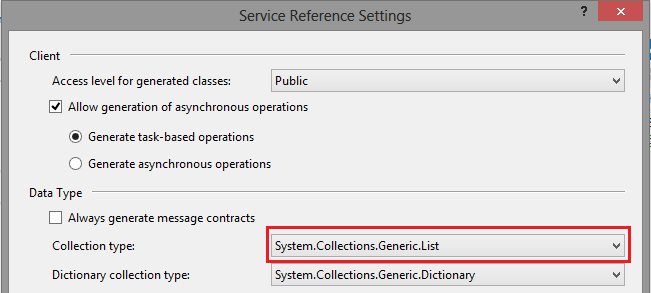
This will bring up a dialog where you can enter the URL of your Meta Data Service. Enter the URL and press the GO button. This will connect and grab the WSDL for the metadata service. Enter a namespace for the service reference proxies (I named it ‘AX’ - don’t add “MetaData” in the name, you’ll soon find out why). I also like to go into advanced and change the Collection Type to List. I love Linq (which also works on Arrays though) and lists are just nicer to work with I find. Click OK on the advanced dialog and OK on the service reference dialog to create the reference and proxies.
Ok, now we are ready to code! We’ll get metadata for a query (we’ll use the AOT query “CustTransOpen” as an example) and print the list of datasources in this query, and print how many field ranges each datasource has. This is just to make sure our code is working.
<pre>static AX.QueryMetadata GetQuery(string name)
{
    AX.AxMetadataServiceClient metaDataClient = new AX.AxMetadataServiceClient();
List<string> queryNames = new List<string>();
queryNames.Add(name);

var queryMetaData = metaDataClient.GetQueryMetadataByName(queryNames);

if (queryMetaData != null && queryMetaData.Count() > 0)
    return queryMetaData[0];

return null; }</pre></code> Very simple code, we create an instance of the AxMetadataServiceClient and call the GetQueryMetadataByName operation on it. Note that we have to convert our query's name string into a list of strings because we can fetch metadata for multiple queries at once. Similarly, we have to convert the results returned from a list back into 1 query metadata object (assuming we got one). We'll return null if we didn't get anything back. If you left the service reference Collection Type to Array, either change this code to create an array of strings for the query names instead of a List, or you can actually right-click the service reference, select "Configure Service Reference" and change the Collection Type to List at this point. We'll make a recursive method to traverse the datasources and their children, and print out the ranges each datasource has, like so: <code><pre>static void PrintDatasourceRanges(AX.QueryDataSourceMetadata datasource) {
Console.WriteLine(string.Format("{0} has {1} ranges", datasource.Name, datasource.Ranges.Count()));
foreach (var childDatasource in datasource.DataSources)
{
    PrintDatasourceRanges(childDatasource);
} }</pre></code> I'm using a console application so I'm using Console.WriteLine, and I have a Main method for the rest of my code. If you're doing a WPF app, you may want to consider outputting to a textbox, and adding the following code somewhere it's relevant to you, for example under the clicked event of a button. Here we call our GetQuery method, and then call the PrintDatasourceRanges for each datasource.
<pre>static void Main(string[] args)
{
    AX.QueryMetadata query = GetQuery("CustTransOpen");
if (query != null)
{
    foreach (var datasource in query.DataSources)
    {
        PrintDatasourceRanges(datasource);
    }
}

Console.ReadLine(); }</pre></code> Note that we have a Console.ReadLine at the end, which will prevent the Console app to close until I press the ENTER key. When we run this project, here's the output:

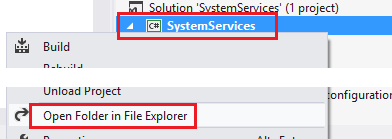
Ok, so we’re getting the query’s metadata. Note that the classes used here (QueryMetadata, QueryMetadataRange etc) are the exact same classes the query service accepts. However, if we add a new service reference for the query service, AX will ask for a new namespace and not re-use the objects already created for the metadata service. If we give it a new namespace we can’t pass the query object received from the metadata back into the query service. Of course I wouldn’t bring this up if there wasn’t a solution! In your solution explorer, right-click on your project and select “Open Folder in File Explorer”.
In the explorer window, there will be a folder called “Service References”. Inside you’ll find a sub-folder that has the name of the namespace you gave your service reference. In my case “AX”. The folder contains XML schemas (xsd), datasource files, the C# files with the proxy code, etc. One particular file is of interest to us: Reference.svcmap. This file contains the URL for the service, the advanced settings for the proxy generation, etc (you can open with notepad, it’s an XML file). But the node called MetadataSources contains only one subnode, with the service URL. If we add a second node with a reference to our second URL, we can regenerate the proxies for both URLs within the same service reference, effectively forcing Visual Studio to reuse the proxies across the two URLs. So, let’s change the XML file as follows. Note that XML is case sensitive, and obviously the tags must match so make sure you have no typos. Also make sure to increment the SourceId attribute.
Original:

New:

Again, I can’t stress enough, don’t make typos, and make sure you use upper and lower case correctly as shown. Now, save the Reference.svcmap file and close it. Back in Visual Studio, right-click your original service reference, and click “Update Service Reference”.
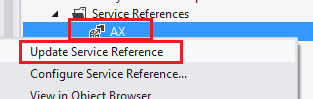
FYI, if you select “Configure Service Reference” you’ll notice that compared to when we opened this from the Advanced button upon adding the reference, there is now a new field at the top that says “Address: Multiple addresses (editable in .svcmap file)”).
If you made no typos, your proxies will be updated and you are now the proud owner of a service reference for metadata service and query service, sharing the same proxies (basically, one service reference with two URLs). First, let’s create a method to execute a query.
<pre>static System.Data.DataSet ExecuteQuery(AX.QueryMetadata query)
{
    AX.QueryServiceClient queryClient = new AX.QueryServiceClient();
AX.Paging paging = new AX.PositionBasedPaging() { StartingPosition = 1, NumberOfRecordsToFetch = 5 };

return queryClient.ExecuteQuery(query, ref paging); }
</pre></code>
Note that I use PositionBasedPaging to only fetch the first 5 records. You can play around with the paging, there are different types of paging you can apply. So now for the point of this whole article. We will change our Main method to fetch the query from the AOT, then execute it. For good measure, we’ll check if there is already a range on the AccountNum field on CustTable, and if so set it. Here I’m doing a little Linq trickery: I select the first (or default, meaning it returns null if it can’t find it) range with name “AccountNum”. If a range is found, I set its value to “2014” (a customer ID in my demo data set). Finally I execute the query and output the returned dataset’s XML to the console.
<pre>static void Main(string[] args)
{
    AX.QueryMetadata query = GetQuery("CustTransOpen");
if (query != null)
{
    var range = (from r in query.DataSources[0].Ranges where r.Name == "AccountNum" select r).FirstOrDefault();
    if (range != null)
    {
        range.Value = "2014";
    }

    System.Data.DataSet dataSet = ExecuteQuery(query);
    Console.WriteLine(dataSet.GetXml());
}

Console.ReadLine(); }</pre></code> And there you have it. We retrieved a query from the AOT, modified the query by setting one of its range values, then executed that query. Anything goes here, the metadata you retrieve can be manipulated like you would a Query object in X++. You can add more datasources, remove datasources, etc. For example, before executing the query, we can remove all datasource except "CustTable". Also make sure to clear order by fields since they may be referencing the other datasources. Again using some Linq trickery to achieve that goal. <code><pre>// Delete child datasource of our first datasource (custtable) query.DataSources[0].DataSources.Clear(); // Remove all order by fields that are not for the CustTable datasource query.OrderByFields.RemoveAll(f => f.DataSource != "CustTable");
</pre></code>
Apr 25, 2013 - Dynamics AX 2012 Compile Times
Filed under: #daxmusings #bizappsAs I’m sure most of you are aware, compile times in Dynamics AX 2012 are a concern with more functionality being added. Especially on our build environments, which are (non-optimized) virtual machines, we are looking at around 3 hours for AX 2012 RTM/FPK and around 5 hours for R2. There have been discussions on the official Microsoft Dynamics AX Forums about this very topic, and there seem to be huge differences in experiences of compile times. After a lot of discussion with other people on the forums, and consequent chats with Microsoft people that are “in the know”, I think it’s pretty clear which areas one needs to focus on to optimize compile times.
1) The AX compiler was originally built when there was no talk about multi-core. So, as a result, you’ve probably noticed a compile only uses one thread. With today’s trend of more cores but at lower clock speeds, an “older” machine (CPU type) may possibly perform better than a new one, or a desktop machine may perform better than a high-end server. 2) The communication between AX and SQL is critical. The communication with the model store is critical (AOS gets the source code from the model store, compiles it, puts the binaries back in the model store). 3) The model store is in SQL so SQL has to perform optimally.
To this end, I set out to build one of our customer’s code bases (AX 2012 RTM CU3, no feature pack) on an “experimental” build machine. This code base has been taking an average compile time of 3 to 3.2 hours every time on our virtual AOS connected with physical SQL.
The new setup? A Dell Latitude E6520 laptop:
- Core i7-2760QM CPU @ 2.4GHz, 4 Cores, 8 Logical Processors
- 8 GB memory
- High performance SSD (Samsung 840 Pro), 256GB
- Windows Server 2012, SQL 2012, AX 2012 RTM CU4
Besides this hardware (2.4ghz clock speed - number of cores doesn’t matter, SSD to maximize SQL throughput), the key elements of our setup are putting the AOS and the SQL server both on this same machine, and disabling TCP/IP in the SQL server protocols so that it uses shared memory instead. This is the least overhead you can possibly get between the AOS and SQL.
The difference in compile time is staggering. I actually ran it multiple times because I thought I had done something wrong. However, since this is an automated build using TFS, I know the steps and code and everything else is EXACTLY the same by definition. So…. drumroll! (Note I didn’t list some extra steps being done in the automated build explicitly so that’s why it may not seem to add up…)
| Old Build Server | New Build Server | |
| Remove old models | 00:00:27 | 00:00:03 |
| Start AOS | 00:01:26 | 00:00:25 |
| Synchronize (remove old artifacts from DB) | 00:06:52 | 00:05:57 |
| Import XPOs from TFS | 00:13:17 | 00:03:55 |
| Import VS Projects | 00:00:29 | 00:00:11 |
| Import Labels | 00:00:22 | 00:00:08 |
| Synchronize (with new data model) | 00:05:42 | 00:01:55 |
| X++ Compile | 02:29:36 | 00:41:28 |
| CIL Generation | 00:13:41 | 00:05:29 |
| Stop AOS | 00:00:10 | 00:00:03 |
| Export Built Model | 00:00:42 | 00:00:12 |
| Total Build Time | 03:14:43 | 01:00:59 |
So yes, the compile time got down to 41 minutes! We’ve actually switched using this machine somewhat permanently for a few customers, we’ll be switching more. Now I need another machine for R2 compiles :-) I will post the compile times for R2 when I get to those.
Happy optimizing! :-)
Blog Links

Blog Post Collections
- The LLM Blogs
- Dynamics 365 (AX7) Dev Resources
- Dynamics AX 2012 Dev Resources
- Dynamics AX 2012 ALM/TFS
Recent Posts
-
GPT4-o1 Test Results
Read more... -
Small Language Models
Read more... -
Orchestration and Function Calling
Read more... -
From Text Prediction to Action
Read more... -
The Killer App
Read more...